Ever spent hours setting up your home theater, only to be disappointed by a washed-out image or glare that ruins the movie night? I remember my frustration when I first tried to enjoy a bright summer evening with my projector. No matter how much I tweaked, the picture just wouldn’t pop—until I realized that my screen choice was the missing piece. That lightbulb moment led me down a rabbit hole of research and experimentation, and now I want to save you some of that hassle. Today, we’re diving into the world of projection screens, specifically ALR technology, fixed frame designs, and screen gain, so you can have a crystal-clear, vibrant home theater experience in 2024.
Why Picking the Right Screen Can Make or Break Your Home Theater
Let’s be honest—most of us don’t have dedicated, darkened cinema rooms. We’re fighting ambient light, reflections, and budget constraints. I once bought a cheap pull-down screen, thinking it would do the job, only to find out it washed out in daylight and lacked the brightness needed for a good picture. That mistake taught me that not all screens are created equal, especially when it comes to bright or well-lit rooms. The right projection screen can enhance image quality, improve brightness, and even allow you to enjoy your movies during the daytime. The secret lies in understanding key factors like screen gain and ALR (Ambient Light Rejection) technology, which can dramatically change your viewing experience.
Is High Screen Gain Worth the Hype or Just a Gimmick?
Early on, I made the mistake of assuming that higher gain always meant better images. I thought, more brightness, better picture, right? Not quite. I learned that high gain screens reflect more light, which can be fantastic in bright rooms but might introduce hot spots or glare if not chosen carefully. This is why I now recommend balancing gain with room conditions. For more detailed insights, check out understanding screen gain. Choosing the right gain is about matching your projector’s brightness and room lighting to avoid issues like uneven brightness or washed-out images.
If you’ve faced the frustration of poor picture quality or glare, don’t worry. I’ll guide you through the must-know features and practical tips to select the perfect screen for your space. Whether you’re in a bright living room or a dedicated dark theater, the right screen setup can elevate your viewing from mediocre to spectacular. Ready to find out how? Let’s explore the essentials that will make your home theater shine in 2024.
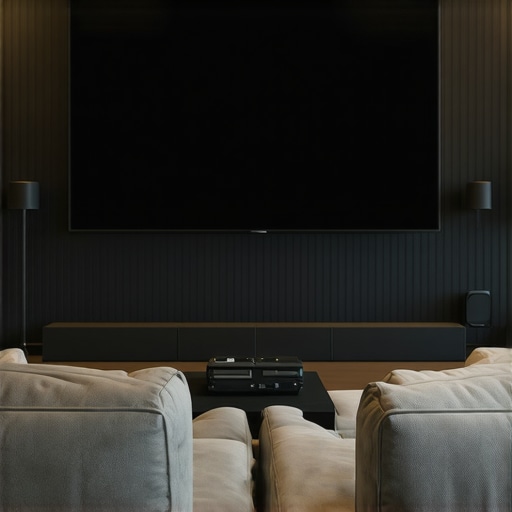
Pick the Right Screen Material to Match Your Room
Start by selecting a projection screen that suits your room’s lighting conditions. For bright environments, consider screens with high gain or ALR (Ambient Light Rejection) technology, which are designed to reflect more light and combat ambient glare. I remember my initial setup where I chose a basic pull-down screen for my living room. After reading about strategies for enhancing image quality, I upgraded to an ALR fixed frame screen. The difference was night and day, especially during daytime viewing. Think of your screen as a paintbrush—choosing the right texture and material can dramatically influence the picture quality you get.
Match Screen Gain with Your Projector’s Brightness
Screen gain defines how much light the screen reflects back. A gain of 1.0 is neutral, like a matte wall, while higher gains (2.0 or more) act like a mirror—reflecting more light for brighter images. I experimented with a high-gain screen I found at a local store, which initially seemed perfect for my projector’s brightness. But I soon noticed hot spots—areas that were overly bright—making the picture uneven. This experience taught me the importance of balancing gain with your projector’s lumens. For detailed guidance, check out understanding screen gain. Proper matching prevents washout and ensures uniform brightness across the entire screen.
Choose Between Fixed Frame and Pull-Down Screens
Fixed frame screens are like a picture frame—they stretch the material tightly, providing a flat, wrinkle-free surface ideal for sharp images. I installed a fixed frame screen in my dedicated theater room following installation guide, which was straightforward if you follow the steps carefully. Pull-down screens are more flexible—they can be rolled up when not in use, saving space. However, they are more prone to wrinkles or movement, which can distort your image. I tested a high-gain pull-down in a bright corner of my living room, and it performed surprisingly well, especially with some adjustments. Use this guide to help decide which type fits your needs best.
Ensure Proper Installation for Optimal Results
Proper setup makes all the difference. Mount your screen at eye level for seated viewing, and ensure it’s perfectly perpendicular to your projector’s beam. During my first attempt, I mounted my fixed frame a bit too high, which caused neck strain and an uneven image. I corrected this by following professional setup tips. Use a level and a measuring tape for precision. Also, consider the room’s ambient light and how reflective surfaces might affect the image. Positioning your screen away from windows and bright walls can reduce unwanted reflections.
Optimize Your Projector Settings for Brightness and Clarity
Adjust your projector’s brightness, contrast, and color settings for the best image quality. I spent time experimenting with different settings, which significantly improved my viewing experience. For detailed calibration techniques, visit this resource. Remember, higher gain screens may require lowering your projector’s brightness to prevent glare and hot spots. Conversely, low-gain screens might need a boost in projector lumens for a vibrant image. Your goal is a balanced, sharp picture with rich colors and even illumination.
Test and Tweak for Perfection
Once everything is set up, sit back and evaluate your image. Walk around the room to check for glare or hot spots. Adjust projector angle, screen position, or settings as needed. I once spent an afternoon tweaking my setup, which resulted in a stunning picture that rivals commercial theaters. Remember, fine-tuning your system is an ongoing process—small adjustments can yield big improvements. Use the insights from top tips for high-gain screens to further enhance your experience.
Many home theater enthusiasts fall into traps that diminish their viewing experience, often due to misconceptions about projection screens, ALR technology, and screen gain. Let’s dig deeper into what most people get wrong and how to avoid costly mistakes. One prevalent myth is that higher screen gain always equals better brightness and clarity. In reality, as explained in understanding screen gain, too high a gain can create hot spots and uneven illumination, especially in larger rooms or with certain projectors. This often leads to glare and a loss of image uniformity, which many assume is a sign of a ‘better’ screen, but it’s actually a common pitfall.
Another mistake is oversimplifying ALR (Ambient Light Rejection) screens as a universal solution. While they are excellent for bright rooms, not all ALR screens are created equal. Some newer breakthroughs in ALR technology are designed to reject specific wavelengths of ambient light more effectively. However, choosing the wrong type for your room’s lighting conditions can leave you disappointed. For example, an ALR screen optimized for high-angle light rejection might underperform if your ambient light mainly comes from windows behind your seating area. It’s crucial to match the technology to your environment rather than relying on generic claims.
Many assume that fixed frame screens are always superior to pull-down options, but that’s not the whole story. Fixed frame screens are often lauded for their flatness and stability, yet they can be inflexible and take up space. Conversely, pull-down screens offer versatility but may suffer from wrinkles or sagging if not installed properly. The real secret is understanding the nuances: for instance, a high-quality motorized pull-down with tensioning features can outperform a low-quality fixed frame in terms of image flatness and ease of use. Don’t fall for the trap of assuming one is always better; assess your room, usage, and budget carefully.
What advanced users often overlook in projection screen setup?
Many seasoned enthusiasts overlook the importance of precise calibration and room-specific adjustments. Even the best screen and projector can underperform if not properly calibrated. According to proven strategies, fine-tuning projector settings, screen height, and room lighting conditions can dramatically improve image quality. This is especially true when integrating high-gain or specialized ALR screens, which may require adjustments to avoid hot spots or glare. Remember, the setup process is not a one-time event but an ongoing process—small tweaks can make a significant difference. Don’t just buy the latest tech; learn how to optimize it for your specific space.
Have you ever fallen into this trap? Let me know in the comments. The key to a stellar home theater lies in understanding the nuances and making informed choices—not just following popular trends.
Keep Your Setup Running Smoothly with the Right Tools and Techniques
Once you’ve invested in a high-quality fixed frame, pull-down, or ALR screen, maintaining it properly ensures your home theater remains stunning for years to come. Regular upkeep isn’t just about cleaning; it involves using the right tools and methods to preserve image quality and prevent damage. In my experience, a well-maintained screen enhances the effectiveness of your projector’s settings and screen technology, allowing you to enjoy crisp, vibrant visuals every time.
How do I maintain my projection screen over time?
Start with gentle cleaning. I recommend using a microfiber cloth, which I keep on hand specifically for screen maintenance. Avoid harsh chemicals or abrasive materials that might damage the surface. For stubborn dust or smudges, lightly dampen the cloth with distilled water or a mild soap solution, then wipe in one direction. This prevents streaks and preserves the integrity of the material. For fixed frame screens, check the tension periodically to prevent sagging or warping, which can distort your image. If you notice wrinkles or loose edges, consult the manufacturer’s guidelines or a professional installer—sometimes re-tensioning or minor adjustments can restore perfect flatness.
In addition, I use a soft brush attachment on my vacuum cleaner to gently remove dust from the frame edges, especially around the mounting points. This prevents dust buildup that can eventually settle on the screen surface and interfere with image clarity. For ALR and high-gain screens, extra care is needed to avoid scratching the surface; always use non-abrasive tools and gentle motions.
Essential tools I swear by for screen maintenance
My go-to toolkit includes a microfiber cleaning cloth, a can of compressed air, and a gentle screen cleaning solution. The compressed air helps blow away dust from hard-to-reach areas without risking scratches. When it’s time for a deeper clean, I use a specific screen cleaner formulated for projection surfaces—these are designed to lift dirt without damaging the coating. I avoid using household cleaners or alcohol-based products, which can degrade the surface over time.
For precision adjustments, I keep a small level and a measuring tape nearby. Proper installation and tensioning are crucial for long-term performance, especially if you have a motorized pull-down or an adjustable fixed frame. Regular checks and minor tweaks can prevent costly repairs or replacements down the line.
What’s next in projection screen maintenance trends?
Looking ahead, I believe advancements in self-cleaning coatings and anti-static surfaces will revolutionize how we care for screens. Companies are exploring nanotechnology that can repel dust and resist fingerprints, reducing the frequency of cleaning. Also, smart sensors might soon alert you when maintenance is needed, optimizing your setup’s longevity. For now, sticking with gentle cleaning routines and proper handling is your best bet to keep your projection system performing at its peak.
Don’t forget—regular maintenance not only preserves your investment but also ensures consistent image quality. Try integrating a monthly check-up using the tools I mentioned, and you’ll notice your home theater’s picture remains sharp and vibrant. If you want tailored advice, feel free to reach out. Remember, a little effort today pays off with stunning visuals tomorrow!
The Hardest Lesson I Learned About projection screen,alr screen,fixed frame screen,pull down screen,screen gain
One of my biggest realizations was that a high screen gain isn’t always the answer. I once thought that cranking up the gain would give me a brighter, more vivid picture, but I overlooked hot spots and uneven illumination. It took trial and error to learn that balancing gain with room size and projector brightness is crucial. Now I always test different gain options and observe how they perform under my specific conditions, avoiding costly mistakes.
3 Myths About projection screen,alr screen,fixed frame screen,pull down screen,screen gain That Held Me Back
Myth one: ALR screens work universally in all bright rooms. Reality: Not all ALR screens are created equal, and choosing the right one depends on your ambient light sources. Myth two: Fixed frame screens are always better than pull-downs. Reality: High-quality motorized pull-downs can outperform fixed frames if installed properly. Myth three: Higher gain means better picture. Reality: Excessively high gain can cause glare and hot spots, ruining image quality.
What Experts Won’t Tell You About projection screen,alr screen,fixed frame screen,pull down screen,screen gain
Many experts emphasize the importance of matching your screen’s gain to your projector’s lumens and room lighting. They also highlight that proper installation and calibration are often overlooked but make a significant difference. The true secret is understanding your specific environment and choosing technology accordingly, rather than following trends blindly. This personalized approach ensures you get the best possible viewing experience every time.
My Essential Toolkit for projection screens
For maintaining my projection setup, I rely on a microfiber cloth, compressed air, and a gentle screen cleaner. These tools help me keep the surface dust-free and free of streaks, preserving image clarity over time. A level and measuring tape are also essential for precise installation and adjustment, preventing sagging or warping that can distort images. Trusting these tools has saved me from costly repairs and kept my theater looking professional.
Books That Changed How I View projection technology
While I haven’t read many books specifically on projection screens, I highly recommend exploring resources on home theater calibration and display technologies. The online guides and expert blogs, like those linked in this article, have been invaluable in deepening my understanding. These sources provide practical insights and detailed technical explanations, helping me make informed decisions that elevate my home theater experience.
Your Turn to Try
Now it’s your turn to enhance your projection setup. Whether you’re upgrading your screen material, choosing between fixed frame and pull-down, or fine-tuning your projector settings, remember that personalization and patience are key. Don’t hesitate to experiment and learn from your environment. Your perfect home theater is within reach—start today and enjoy the spectacular visuals you deserve.
2 Responses