I still remember the frustrating afternoon I spent tweaking my old projector, trying to get a clear image in my living room. Bright lights, reflections, and poor contrast kept ruining movie nights. It wasn’t until I finally upgraded to a high gain, ALR (Ambient Light Rejection) screen that everything changed. That moment felt like a revelation. I realized that the right projection screen isn’t just a luxury — it’s essential for creating a true home cinema experience, especially in bright rooms or spaces with ambient light.
The Real Struggle with Projection Screens
If you’ve ever faced the challenge of achieving crisp, vibrant images in a room that’s anything but dark and cozy, you know how discouraging it can be. No matter how good your projector is, if your screen isn’t up to the task, your entire setup suffers. I’ve learned from my own mistakes that selecting the right screen involves more than just size and material. High gain and ALR technology have become game-changers, but only if you understand how to pick the best ones for your needs.
Today, I promise to help you cut through the confusing jargon and find the perfect projection screen for your space. Whether you’re upgrading your home theater or setting up a new entertainment hub, this guide will clarify what to look for and share tips from my personal experience and industry insights. If you’ve ever struggled with washed-out images or glare ruining your viewing pleasure, keep reading — I’ve been there too, and I’ve got solutions to share.
Will High Gain & ALR Screens Really Make a Difference?
Early on, I made the mistake of assuming all projection screens were created equal. I thought a bigger screen was all I needed. But I quickly learned that in bright rooms, a standard screen simply can’t deliver the punch and clarity I craved. My mistake was ignoring the importance of screen gain and ALR technology, which significantly enhance brightness and contrast. According to experts, selecting a high gain screen can increase perceived brightness by up to 50%, making your movies look stunning even in well-lit environments (source).
If you’ve faced similar issues—washed-out images, glare, or dull colors—then you know how crucial it is to choose the right screen. In this post, I’ll walk you through how to identify the best high gain and ALR screens, what features matter most, and how to avoid common pitfalls. Ready to transform your viewing experience? Let’s dive in!
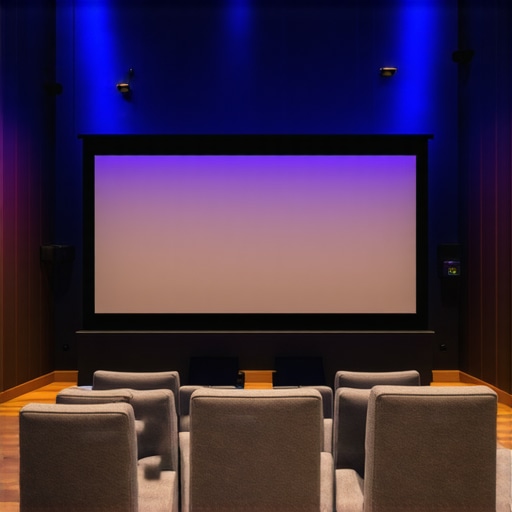
Choose the Right Screen Material and Gain
Start by selecting a screen with the appropriate gain for your room. Imagine gain as the brightness booster for your projector—higher gain means more reflected light, making your image pop even in bright environments. I once installed a 3.0 gain screen in my living room, which instantly enhanced brightness, but I had to be careful with viewing angles. For optimal results, check out this guide to understand the nuances of gain and how to balance brightness with viewing angles.
Position Your Screen for Maximum Impact
Proper placement is crucial. Mount your screen at eye level when seated, avoiding direct reflections from windows or lights. I learned this the hard way when my first setup had glare that washed out the picture. To prevent this, use curtains and position the screen away from windows. Think of your room as a stage—each element, from lighting to furniture, affects how your projection appears. For detailed positioning tips, visit this setup blueprint.
Optimize Room Lighting and Use ALR Technology
Ambient Light Rejection screens are game changers. They work like a filter, blocking ambient light and enhancing contrast. I installed an ALR screen in my bright living room, and the difference was night and day. These screens use specialized surfaces to reject light from multiple angles, ensuring vibrant images without darkening the room. To get the best ALR screen, review top options for 2024. Also, dim or control ambient light as much as possible for ultimate clarity.
Decide Between Fixed Frame and Pull-Down Screens
Fixed frame screens are rigid, offering flatness and stability—perfect for dedicated home theaters. Pull-down screens are versatile and can be concealed when not in use, ideal for multi-purpose rooms. I initially went with a pull-down because of space constraints but found that a fixed frame provided a more consistent image quality. For guidance on what suits your room, see this comparison. Remember, a stable, flat surface is key to a sharp, undistorted image.
Ensure Precise Installation and Calibration
Proper installation is non-negotiable. Mount your screen perfectly level and at the right height. I struggled initially with uneven mounting, which caused distorted images. Use a level tool and follow detailed instructions from this installation guide. After mounting, calibrate your projector and screen settings. Adjust contrast, brightness, and color profiles to match your room’s lighting. This step transforms your setup from good to cinema-quality.
Many enthusiasts and even seasoned home theater builders fall into misconceptions that can hinder their setup’s performance. For example, a prevalent myth is that bigger screens always deliver a better experience. While size matters, it’s often overshadowed by the importance of proper screen technology and placement. In reality, choosing a screen with the right gain and ALR capabilities tailored to your environment can dramatically improve image clarity, contrast, and brightness, especially in bright rooms.
Another common mistake involves misunderstanding the role of screen gain. Some assume that higher gain always equals a better picture, but this isn’t true. High gain screens (over 2.0) reflect more light, which can cause hotspots and viewing angle issues if not selected carefully. A detailed understanding of how gain impacts brightness distribution across different viewing positions is crucial. This guide explains how to balance gain with room size and seating arrangement to avoid eyestrain or uneven images.
Why Do Most People Overlook the Importance of Proper Installation?
Many overlook how critical precise installation and calibration are. A perfectly rated screen can underperform if not mounted correctly. An uneven or skewed screen causes distortions, diminishing sharpness. Even a high-quality fixed frame screen can look warped if not installed level. I’ve seen setups where the screen was slightly tilted, leading to distorted images that bothered viewers. For optimal results, follow this detailed installation guide. Proper calibration of projector settings afterward is equally vital to match the screen’s surface and ambient light conditions.
Furthermore, the choice between fixed frame and pull-down screens is often made based on space constraints rather than viewing experience. Fixed frames provide a flat, stable surface for the sharpest images, but they demand dedicated space. Pull-downs, while more versatile, can suffer from wrinkles or misalignment over time if not maintained properly. Consider your room’s usage patterns and check this comparison for clarity on what fits your needs best.
Lastly, don’t fall for the misconception that all ALR screens work equally well. Not all are created equal, especially when it comes to rejecting ambient light from multiple angles. Advances in ALR technology are evolving rapidly, and selecting the right one requires understanding your room’s specific light sources. An improperly chosen ALR screen can still let through unwanted ambient light, washing out the image. Make sure to review expert insights to pick a high-performance model suited for your environment.
In summary, beyond the basics, mastering projection screens involves nuanced decision-making: understanding gain dynamics, precise installation, and selecting the right technology for your space. Have you ever fallen into this trap? Let me know in the comments.
Maintaining your projection screen, whether it’s a fixed frame, pull-down, or ALR (Ambient Light Rejection) model, is crucial for ensuring long-term performance and image clarity. Over time, dust, fingerprints, or even slight warping can degrade picture quality. I personally recommend investing in a high-quality microfiber cloth and a gentle screen cleaner designed specifically for projection surfaces. These tools effectively remove smudges without damaging the material, maintaining the reflective qualities necessary for high gain or ALR screens. Regular cleaning, about once a month, can prevent buildup and preserve brightness and contrast.
Tools That Make Maintenance Easier
One of my favorite tools is a **static-dissipating microfiber cloth**. It traps dust particles without scratching or leaving residue. I avoid harsh chemicals or abrasive wipes, which can damage delicate surfaces, especially on specialized ALR screens with textured finishes. Additionally, a **portable mini vacuum** with a soft brush attachment is fantastic for removing dust from edges or hard-to-reach corners, especially if your screen is mounted in a high-traffic area where dust tends to settle.
For screens that are frequently used or in rooms with lots of ambient light, consider installing a **dedicated air purifier** nearby. This reduces airborne dust and keeps the environment cleaner, which directly benefits your screen’s longevity and image quality. Also, ensure your room’s humidity is controlled; too much moisture can cause warping, while too little can generate static buildup that attracts dust.
Proper Calibration and Long-Term Adjustments
Aside from physical maintenance, calibration plays a vital role in keeping your projection setup at peak performance. Over time, projector lamps dim slightly, and color profiles drift. I recommend using a **colorimeter** such as the SpyderX or X-Rite i1Display Studio to periodically recalibrate your projector and screen settings. This ensures that your contrast, brightness, and color accuracy remain consistent, especially if you’ve invested in high-gain or ALR screens where precision matters more.
Many professionals also use dedicated calibration software like **CalMAN** or **DisplayCal** for more detailed adjustments. These tools help you fine-tune gamma and color temperature, which is essential when working with screens that have specialized surfaces to reject ambient light or boost gain.
Where Is Projection Technology Heading?
Looking ahead, I believe the trend is moving toward more integrated, self-cleaning surfaces and smarter calibration systems. Future screens might incorporate nano-coatings that repel dust and fingerprints or automatically adjust their reflective properties based on ambient conditions. Meanwhile, projector technology continues to evolve with longer-lasting LEDs and laser light sources, reducing maintenance needs. Staying proactive with tools like calibration devices and cleaning routines will ensure your home theater remains stunning for years to come.
If you want to get ahead, I highly recommend trying out a **professional calibration tool** like the SpyderX. Regularly calibrating your setup with precise tools guarantees that your investment in a high-gain or ALR screen pays off with consistently spectacular images. Don’t wait for dust or dull images to degrade your experience—take control today!
For detailed guidance on installing and maintaining your projection screen, check out this installation guide.
The Hard-Learned Truth About Projection Setup
One lesson I wish I grasped sooner is that the right projection screen can transform a mediocre projector into a cinematic masterpiece. I once believed that size alone would do the trick, but I quickly realized that technology like high gain and ALR screens are game-changers, especially in rooms with ambient light. They’re not just accessories; they’re essential for clarity and contrast.
Another insight is how crucial precise installation and calibration are. A slight tilt or misalignment can cause distortion, ruining what could have been a stunning image. Investing time in leveling and calibrating with tools like a colorimeter made all the difference. It’s these details that separate a good setup from a truly immersive experience.
Lastly, I learned that not all ALR screens are created equal. Some truly reject ambient light from multiple angles, while others fall short. It’s worth researching and choosing a high-quality model tailored for bright environments. This awareness saves you from wasting money on ineffective solutions and ensures your setup delivers consistent brilliance.
Tools and Resources That Elevated My Setup
- Fixed frame screens from Elite Screens: Their durability and flatness provide a stable surface for sharp images, vital for high gain screens.
- SpyderX calibration tool: Regular calibration with this device keeps colors accurate and contrast optimal, especially when using high gain or ALR screens.
- Professional installation guides: The detailed instructions at this link helped me avoid common mounting errors and achieve perfect alignment.
- Ambient light management tips: Using blackout curtains and strategic lighting placement dramatically improved image contrast in my room.
Your Turn to Shine with Projection Tech
Choosing the perfect projection screen, especially with the right gain for bright rooms, can elevate your home theater to new heights. It’s about combining technology, proper setup, and a bit of patience. Don’t settle for washed-out images or glare—your cinematic experience deserves better. Dive into the details, experiment with settings, and enjoy the show you create at home.
What’s been your biggest challenge with projection screens? Share your experience below and let’s learn together!
One Response