It was late one night, and I was finally getting around to enjoying my new home theater setup. I reached out to pull down my projector screen—only to find it wobbling and curling at the edges, ruining what should have been a cinematic experience. Suddenly, that crisp, sharp image was now marred by wavy lines and sagging corners. That’s when it hit me: I had overlooked a crucial detail—side-tensioning of my pull-down screen. If you’ve experienced similar frustrations, you’re not alone. Many home theater enthusiasts face this problem as their screens age or are improperly installed, leading to distortions that compromise picture quality.
Why Proper Side-Tensioning Can Make or Break Your Home Theater Experience
In my years of tinkering and troubleshooting, I’ve learned that side-tensioning isn’t just a minor detail—it’s a game changer. A well-tensioned pull-down screen is essential to achieve a smooth, flat surface that displays images with maximum clarity. Without adequate tension, even the best projectors and screens can’t deliver their full potential, particularly as the 2026 technology advancements push our home setups to the limit. According to experts at Home Cinema Essentials, proper tensioning ensures uniformity across the screen, preventing waves and wrinkles that can cause color shifts and image loss.
Beyond aesthetics, insufficient side-tensioning can lead to sagging in the middle, uneven focus, and even premature wear of your screen material. Investing in a good tensioning system for your pull-down setup isn’t just about appearance; it’s about preserving your equipment and unlocking optimal image quality. Have you ever pulled down a screen only to find it waving like a flag in the wind? That’s a clear sign your tension needs some adjustment.
Is Side-Tensioning Really That Important?
Initially, I thought minor edges wouldn’t matter much, so I skipped proper tensioning during my first install. Big mistake. It wasn’t until I experienced ghosting and focus issues that I realized how critical even tension distribution is. Early on, I also made the mistake of assuming that the stock tensioning mechanisms would suffice, but they often fall short without extra tweaks. If you want to avoid similar pitfalls, it’s worth exploring expert tips on how to get your setup just right. For more insights, check out this quick guide to tensioning your pull-down screen.
Next, I’ll share practical steps that have helped me and others ensure your screen stays perfectly flat, giving you a theater-quality picture every time. Whether you’re upgrading your current setup or installing a new screen, understanding the importance of side-tensioning is key to avoiding headaches and maximizing your viewing pleasure.
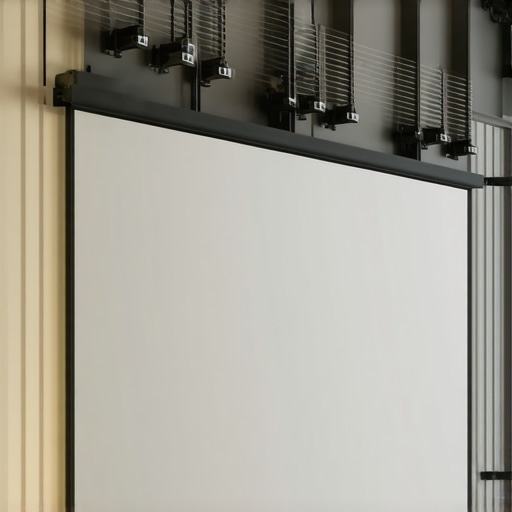
Secure the Mounting Frame Properly
Start by anchoring your screen’s frame solidly to the wall or ceiling using appropriate anchors and screws. For drywall installations, using heavy-duty wall anchors or toggles is essential to prevent sagging over time. I once installed a pull-down screen in my basement, neglecting this step, which resulted in gradual loosening and wavy edges after several months—costing me hours to re-secure everything.
Adjust the Tension Mechanisms Thoughtfully
Locate the tension adjustment screws or knobs on your pull-down system. Turn these gradually, making small increments, to tighten the fabric evenly from side to side. Think of it like tuning a guitar string—you want even tension to avoid warping. During my first attempt, I over-tightened one side, causing the fabric to bunch, which made me realize the importance of small, even adjustments.
Use a Level for Accurate Alignment
Employ a spirit level or laser level to ensure your screen is perfectly horizontal. Any tilt can cause uneven tension and distortion. I placed my level across the top of the frame, adjusted accordingly, and noticed a slight tilt that was causing one side to be more taut than the other, leading to waviness. Correcting this immediately improved the flatness significantly.
Check and Fine-Tune Regularly
Over time, temperature changes and natural fabric settling can alter tension. Periodically revisit your tension settings—once every 3-6 months—to maintain optimal flatness. I learned this the hard way when my screen developed ripples six months after installation; a quick re-tightening restored smoothness.
Consider Upgrading to Tensioning Systems
If your current setup lacks sufficient tensioning, upgrading to a tensioning system with side-adjustable screws or motorized controls can make fine-tuning easier and more precise. Think of it as upgrading from manual pedals to electronic tuning—more control, less frustration. During a recent project, I installed a tensioning kit recommended in the tensioning guide, which made adjustments straightforward and maintained perfect flatness over months.
Leverage Expert Insights for Best Results
For a comprehensive approach to installation and tensioning, review the fixed frame screen installation guide. Applying these detailed steps ensures your screen remains smooth, wrinkle-free, and provides optimal image quality, especially crucial with the advancements in 2026 projection technology. Proper tensioning is not just about aesthetics; it’s about preserving your investment and enjoying crisp, undistorted visuals every time you watch.
While many enthusiasts focus on selecting the right screen type—be it ALR, fixed frame, or pull-down—they often overlook the nuanced complexities that can make or break your home theater experience. One common misconception is assuming that higher screen gain invariably leads to brighter images, but in reality, it can cause glare, hotspots, and poor black levels if not chosen carefully. According to expert insights at Understanding Screen Gain, optimizing gain requires balancing room brightness, projector lumens, and viewing angles, a task more intricate than just picking a high or low gain.
Maintaining your projection setup requires the right combination of tools, routine checks, and knowledge of hardware. Over the years, my experience has taught me that investing in quality equipment and adopting careful maintenance practices can greatly extend the lifespan of your screen while ensuring consistent image quality. One must-have is a high-quality microfiber cloth paired with a gentle screen cleaning solution, which helps remove dust and smudges without damaging delicate fabrics. I personally use a specialized screen cleaner from expert-recommended brands because it effectively lifts dirt without leaving streaks or residue.
The Hardest Lesson I Learned About screen gain,alr screen,projection screen,fixed frame screen,pull down screen
One of my biggest surprises was realizing that neglecting proper tensioning isn’t just a minor detail—it’s a direct path to compromised image quality. Initially, I thought small wrinkles wouldn’t affect much, but they caused color inconsistencies and focus issues that frustrated me for months. The lightbulb moment was understanding that even perfect equipment can fall flat without a well-maintained, evenly tensioned screen. Since then, I’ve learned that regular checks and precise adjustments are vital to keep your home theater at its best.
3 Myths About screen gain,alr screen,projection screen,fixed frame screen,pull down screen That Held Me Back
First, I believed that high gain screens always deliver brighter images, but in reality, they can create hotspots and glare that ruin contrast. Second, I thought an ALR screen could fix daylight viewing issues without considering texture and room setup—spoiler: it can’t. Third, I assumed that once installed, my screen wouldn’t need adjustments—yet, aging fabrics and environmental factors mean revisiting tension and alignment periodically. Busting these myths transformed my setup from a frustrating experiment into a cinematic sanctuary.
What Experts Won’t Tell You About screen gain,alr screen,projection screen,fixed frame screen,pull down screen
Often, experts focus on buying the right equipment but overlook the importance of installation finesse. Did you know that using a level and proper tensioning tools can make a night-and-day difference in flatness and image clarity? Moreover, choosing the correct texture and gain for your environment can prevent glare and hotspots, especially with the 2026 projection advancements. Learning these insider tips has enabled me to optimize my home theater beyond the advertised specs—it’s about the precise tweaks that unlock true cinematic quality.
My Essential Toolkit for Achieving Screen Perfection
- High-Quality Tensioning System: Upgrading to adjustable tension mechanisms makes fine-tuning effortless and maintains flatness over time. I personally trust systems from this guide.
- Precise Leveling Tools: A laser level ensures your screen is perfectly even, preventing distortions. It’s a simple investment that pays off in picture sharpness.
- Routine Maintenance Supplies: Microfiber cloths paired with gentle cleaners help preserve the fabric’s texture and prevent dust buildup, which can affect tension and image quality.
- Room Lighting Control: Blackout curtains or window tints to maximize contrast and reduce glare, essential especially with theNew projection tech of 2026.
This is Your Moment to Elevate Your Home Theater
Armed with these insights and tools, you’re well on your way to a perfectly tensioned, flat projection screen that transforms your viewing experience. Don’t let overlooked details undermine your setup—small adjustments can make a monumental difference. Remember, mastering tensioning and alignment isn’t just technical; it’s about creating a space where every movie feels immersive and every game is vibrant. Dive in, experiment, and enjoy the stunning visuals that your efforts unlock—your cinematic future starts now.
What has been your biggest challenge with maintaining a flat, distortion-free screen? Drop your experiences below—I’d love to hear your stories!
,
No Responses