I still remember the moment I realized I’d invested hundreds, maybe thousands, into my home theater setup—big screen, surround sound, the works—only to be disappointed by the blurry, uneven image projected on a flimsy, poorly mounted screen. It was frustrating. That lightbulb moment made me realize that my entire viewing experience depended heavily on the quality and placement of my projection screen. And let me tell you, the difference between a cheap screen and a well-chosen, high-quality fixed frame or pull-down screen can be astonishing.
Why Your Screen Choice Can Make or Break Your Home Theater
When I first started setting up my home theater, I underestimated how crucial the screen was. I thought that as long as I had a good projector, the image would be great. Turns out, the screen is just as important—if not more so—than the projector itself. A poor-quality screen can wash out bright colors, introduce glare, or create uneven images that ruin your viewing pleasure. Conversely, the right screen can maximize brightness, enhance contrast, and deliver razor-sharp images that make you feel like you’re at the movies.
Choosing the right projection screen isn’t just about aesthetics or brand name. There’s a science behind it—like understanding screen gain, material, and whether a fixed frame or pull-down setup suits your space. And trust me, making the wrong choice early on is a mistake I made, which led to costly reworks. You can read more about that common pitfall in my installation guide.
Is the Hype About Fixed Frame and Pull-Down Screens Justified?
One of my biggest doubts was whether investing in a high-end fixed frame or pull-down screen was worth it, especially in a bright room. The truth is, technology advances like ALR (Ambient Light Rejection) screens are game-changers. They let you enjoy vibrant images even with ambient light. But not every screen is created equal—some are better suited for certain room conditions or viewing preferences. I’ll walk you through how to choose wisely, so you don’t waste your money on a setup that underperforms.
So, if you’ve ever faced the dilemma of blurry images, uneven surfaces, or just feeling unsure about which screen type will give you the best bang for your buck, stick around. We’re going to explore the key factors that will help you select the perfect projection screen for your home theater, ensuring you get spectacular picture quality every time you press play.
,
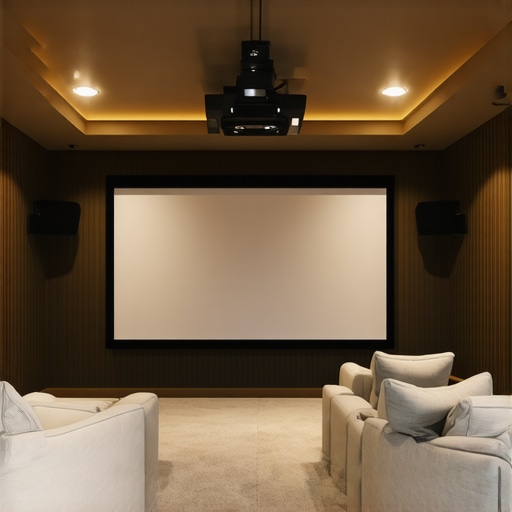
Pick the Right Screen Size and Position
Start by measuring your room carefully. Use a tape measure to determine the ideal viewing distance—generally, the screen should be about 1.5 to 2.5 times the diagonal size of your projector’s image. Mark the wall or ceiling where the screen will hang, considering furniture placement and room lighting. I remember in my first setup, I initially mounted a screen too high, which made viewing uncomfortable; lowering it to eye level improved the experience instantly. For detailed guidance, visit the setup blueprint.
Select the Material and Gain
Choosing the right screen material is crucial. Fixed frame screens often come with a variety of materials—matte, satin, or ALR (Ambient Light Rejection)—each serving different needs. For bright rooms, ALR screens help reject ambient light and preserve vivid colors. When I upgraded to an ALR screen, the contrast and brightness improvements were dramatic, especially during daytime viewing. Understand the concept of screen gain—the measure of reflectivity—by reading about screen gain. Higher gain screens produce brighter images but can introduce hotspots if not properly installed, so balance gain with room conditions.
Decide Between Fixed Frame and Pull-Down
Fixed frame screens offer a sleek, taut surface ideal for permanent setups, while pull-down screens are versatile for multi-purpose rooms or temporary use. I opted for a fixed frame because it provided a perfectly flat surface, which was essential for sharp images. To compare the benefits, check fixed vs. pull-down. Remember, a good installation is key—measure twice, drill once. For step-by-step instructions, consult the installation guide.
Ensure Proper Mounting and Tension
Mount your screen securely to prevent sagging or wrinkles. Use a level to align the frame perfectly and tighten all mounting brackets. In my experience, using a laser level to mark mounting points saved me from crooked screens that distorted images. For professional tips, see the blueprint for setup. If you choose a pull-down, check that the mechanism operates smoothly and that the screen maintains tension when retracted. Proper mounting not only improves image quality but also prolongs the life of your screen.
Optimize Ambient Light Conditions
Even the best screens can struggle in bright environments. Consider installing window treatments or adding ambient lighting controls. If ambient light is unavoidable, opt for an ALR screen with high gain to combat glare. I installed blackout curtains in my room, which transformed my viewing experience—colors became richer, and images sharper. To learn more about maximizing brightness and contrast, read high-gain screen tips. Proper lighting control complements your screen choice, enhancing overall quality.
Test and Fine-Tune Your Setup
Once installed, run test patterns and calibrate your projector for optimal focus, color, and contrast. Adjust the screen position if needed, and ensure it remains taut and flat. During my initial setup, I noticed slight warping on the edges, which I corrected by tightening the frame. For advanced calibration techniques, visit the image quality guide. Fine-tuning ensures your home theater delivers cinematic visuals that truly impress.
Many home theater hobbyists believe that selecting a projection screen is simply a matter of picking the biggest or most popular model. However, the real nuances lie in understanding how common misconceptions and overlooked details can sabotage your setup. Let’s dig deeper into what most people get wrong about projection screens and how to avoid costly mistakes.
Why Bigger Isn’t Always Better
It’s a widespread myth that larger screens automatically mean a better viewing experience. In reality, choosing a screen that’s too big for your room’s dimensions can lead to a loss of image clarity and immersion. The optimal screen size depends heavily on your viewing distance and room lighting conditions. Oversized screens in small rooms create discomfort and reduce perceived image sharpness, especially if your projector isn’t high enough wattage or resolution. For expert guidance on sizing, check the blueprint for setup.
Misunderstanding Screen Gain and Its Impact
Many assume higher gain screens always produce brighter images, but this isn’t the whole story. High gain surfaces reflect more light back to the viewer, which can cause hotspots and uneven brightness if not installed correctly. Conversely, low gain screens provide a more uniform image but require more ambient light control and a brighter projector. Mastering the balance between gain and ambient conditions is a nuanced skill. For detailed insights, explore understanding screen gain.
The Overlooked Role of Ambient Light Rejection
While many focus on resolution and contrast, they often neglect ambient light rejection (ALR) technology. A common mistake is assuming that any high-gain screen will suffice in bright environments. In truth, ALR screens are engineered to minimize light scatter and glare, significantly improving picture quality during daytime or in rooms with windows. Not all ALR screens are equal—some outperform others significantly. For expert advice, read about ALR technology breakthroughs.
How to Avoid the Most Common Projection Screen Mistakes
The key is to understand that your screen’s material, size, gain, and ambient light management must be tailored to your specific room. Blindly following popular trends or choosing based solely on price often results in subpar performance. For example, a well-installed fixed frame screen with proper tension and placement will outperform a cheap pull-down model that sags or warps over time. Proper mounting, as detailed in the installation guide, ensures your investment delivers consistent quality. Have you ever fallen into this trap? Let me know in the comments.
In summary, the secret to a truly spectacular home theater setup lies in understanding these hidden nuances. Don’t let common misconceptions sabotage your investment—take the time to learn about gain, size, ambient light, and proper installation. Your future self will thank you for it.
Once you’ve installed your high-quality projection screen, the journey doesn’t end there. Maintaining optimal performance over time requires the right tools and a consistent maintenance routine. In this section, I’ll share the specific equipment and methods I rely on to keep my screen in top shape, ensuring every viewing remains crystal clear and vibrant.
Cleaning Equipment for a Pristine Surface
Proper cleaning is critical to prevent dust, fingerprints, or smudges from dulling your image. I use a microfiber cloth—preferably with anti-static properties—to gently wipe the surface without scratching. For stubborn spots, a mixture of distilled water with a few drops of isopropyl alcohol (70%) does the trick. Avoid harsh chemicals or abrasive materials, which can damage delicate screen surfaces. Regular light cleaning once a month keeps my screen looking brand new and prevents dust buildup that can cause image distortion.
Calibration Tools for Perfect Picture
Calibration is essential to get the most out of your projector and screen combination. I personally use a SpyderX colorimeter, which connects to my laptop and helps me fine-tune color accuracy, brightness, and contrast. This device provides precise readings, allowing me to adjust my projector settings for the best possible picture quality. For those seeking professional-grade results, investing in calibration software like CalMAN or LightSpace can be worthwhile. Regular calibration—every six months or after any major room changes—ensures consistent image performance.
Mounting and Tension Maintenance
Over time, even well-installed screens can loosen or sag slightly. I recommend keeping a small set of Allen wrenches or screwdrivers handy to tighten mounting brackets periodically. For pull-down screens, inspecting and lubricating the mechanism with a silicone-based lubricant helps maintain smooth operation. Proper tensioning is key to preventing wrinkles or warping, which can degrade image sharpness. Also, inspecting the frame for warping or damage ensures your screen remains taut and flat, preserving that professional look and performance.
Future Trends in Screen Maintenance and Technology
Looking ahead, I predict that smart maintenance tools—like automated calibration systems and self-cleaning surfaces—will become more common. Innovations such as anti-static, anti-fingerprint coatings, and even embedded sensors that alert you when cleaning or adjustments are needed are on the horizon. These advancements will make long-term upkeep easier and more effective, giving enthusiasts and professionals alike peace of mind. Staying informed about these trends can help you plan upgrades and maintenance routines that keep your home theater setup state-of-the-art.
How do I keep my projection screen working flawlessly over time?
The key is regular, gentle cleaning, periodic calibration, and proactive mounting checks. Using the right tools like microfiber cloths, colorimeters, and lubricants ensures your screen remains in excellent condition. Also, staying aware of emerging technologies can provide options for simplifying maintenance or enhancing performance. For instance, investing in a high-quality calibration device now can save you hours of tweaking later. Don’t forget to visit the installation guide for detailed tips on mounting and tensioning. Ready to take your maintenance routine to the next level? Try calibrating your projector with a colorimeter today and enjoy consistently stunning visuals.
The Hardest Lesson I Learned About Projection Screens
Early in my home theater journey, I underestimated the importance of the screen material and mounting precision. I thought a big screen was enough, but I soon realized that even a high-end projector couldn’t compensate for a sagging, poorly lit, or mismatched screen. The realization that the screen’s quality and setup directly impact image clarity was a lightbulb moment that transformed my approach and saved me from costly redo’s.
3 Myths About Projection Screens That Held Me Back
One of the biggest misconceptions was that larger screens always deliver a better experience. In reality, room size, viewing distance, and projector resolution matter more. I also believed that high gain screens are always brighter; however, I learned they can cause hotspots if not correctly installed. Finally, I thought all ambient light rejection (ALR) screens are equal—this myth led me to overlook the importance of choosing a high-quality ALR that suits my room’s lighting conditions.
What Experts Won’t Tell You About Selecting the Perfect Screen
Despite the abundance of online advice, some crucial insights are often missing. For example, the significance of proper tensioning and mounting to prevent wrinkles and warping is vital for sharp images. Additionally, the right calibration tools, like a colorimeter, can dramatically enhance your picture quality but are frequently overlooked. Lastly, understanding the science behind screen gain and how ambient conditions affect performance can make the difference between a good setup and an exceptional one.
My Essential Toolkit for Home Theater Projection
Over the years, I’ve found certain tools indispensable. A high-quality microfiber cloth and gentle cleaning solutions keep my screen pristine. A calibration device like SpyderX ensures my projector and screen perform at their best. For installation, a laser level and sturdy mounting brackets prevent misalignment and sagging. Investing in these tools has consistently paid off by maintaining optimal image quality and longevity of my setup.
Where to Go from Here
If you’re serious about elevating your home theater, start by thoroughly understanding your room’s lighting, size, and your projector’s capabilities. Choose a screen material and gain suited for your environment, and pay close attention to mounting and tensioning. Regular maintenance, calibration, and staying informed about new technologies like ALR and high-gain screens will keep your setup cutting-edge. Remember, the journey is ongoing—each tweak brings you closer to cinema-quality visuals right in your home.
Your Turn to Make the Shift
Now that you know some of the hidden lessons about projection screens, what’s the first change you plan to make in your setup? Drop your thoughts below and let’s discuss how you can create the ultimate home theater experience!
3 Responses
Reading this post really resonated with my own experience. When I first set up my home theater, I just focused on choosing the biggest projector and screen I could afford, assuming size alone would deliver cinema-quality visuals. However, I quickly learned that proper mounting and the quality of the screen material were equally, if not more, important. The difference was night and day after I upgraded to a high-gain ALR fixed frame screen, and properly tensioned it to eliminate wrinkles. It got me thinking about the subtleties involved in calibration and maintenance — even small adjustments can enhance picture clarity dramatically. Has anyone here experimented with different screen materials or gain levels for specific room lighting conditions? I’d love to hear your insights or recommendations, especially for rooms with ambient daylight during daytime viewing.
This post really hits home about the importance of selecting the right projection screen. I’ve learned from experience that even with a top-tier projector, a low-quality or improperly mounted screen can ruin the entire viewing experience. One thing I’ve found especially useful is investing in an ALR screen for rooms with lots of ambient light — it’s a game changer. But what has made the most difference for me is ensuring the tensioning is perfect. I once tried a pull-down screen that sagged slightly over time, which caused blurring at the edges. Fixing that by tightening the tension really sharpened the image.
I’m curious, how do others here handle maintenance after installation? Do you find regular calibration makes a noticeable difference, or is it more for perfectionists? It seems like a small task but can really optimize picture quality over the long run. Any tips on easy-to-use calibration tools for home setups would be appreciated. Overall, it’s clear that paying attention to these details greatly enhances the home theater experience.
This post brought up some great points about the importance of choosing the right projection screen for a home theater setup. I completely agree that investing in a high-quality fixed frame or pull-down screen can drastically improve image clarity and overall viewing experience, especially in rooms with ambient light. I’ve experimented with different materials, and I found that ALR screens are particularly effective in bright rooms—they really help maintain vibrant colors and contrast.
One challenge I faced was maintaining the screen’s tension over time, which can lead to wrinkles or sagging, affecting image quality. Regularly tightening the frame or using tensioning tools made a noticeable difference. From your experience, does anyone have recommendations for tools or techniques to keep screens perfectly taut in the long run?
Also, I’m curious about how others approach calibration after installation. I’ve used basic colorimeters, but I’m considering investing in more advanced software. Do you think regular calibration is essential to keep the picture sharp, or can a good initial setup last for years with minimal adjustments? Would love to hear your insights or tips on maintaining peak performance over time.