I remember the first time I set up my home theater. I was so excited—until I turned on the projector in my bright living room and saw a washed-out image, barely recognizable against the glare of natural sunlight. That moment was a real eye-opener. I had invested in a high-quality projector but overlooked one crucial piece: the screen. It was a frustrating experience, and I knew I wasn’t alone. Many home theater enthusiasts face this exact problem—trying to enjoy a crisp, vibrant picture in a space that’s far from ideal for projection.
Why Bright Rooms Demand Special Projection Screens
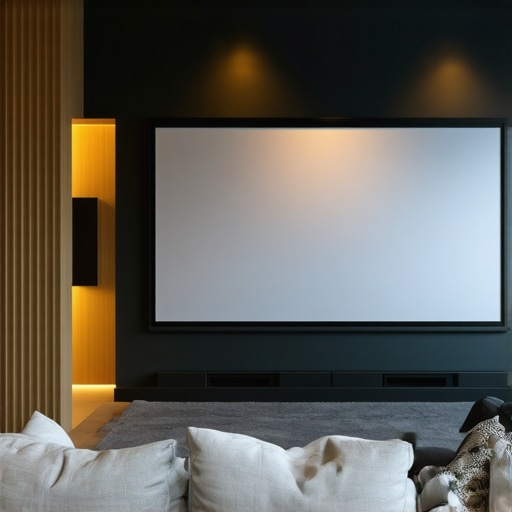
Bright rooms pose a unique challenge for projection setups. Ambient light washes out images, reducing contrast and color accuracy. This isn’t just a minor inconvenience; it can ruin your entire viewing experience. That’s where screens with high screen gain come into play. They are designed to reflect more light toward your eyes, making images appear brighter and more vivid, even in well-lit environments. But choosing the right screen isn’t just about screen gain—factors like screen type, material, and installation matter too. If you’ve ever wondered whether a fixed frame or pull-down screen is better for your situation, you’re not alone. I’ve been there, too, and I’ve learned a lot through trial, error, and a bit of research.
Are Fixed Frame and Pull-Down Screens Really Worth It?
Early in my journey, I made the mistake of assuming all projection screens are created equal. I bought a cheap pull-down model, thinking it would suffice. Spoiler: it didn’t. The image quality was subpar, and the surface sagged over time. It was a classic mistake—skimping on the screen setup because I underestimated its importance. Since then, I’ve discovered that a good fixed frame or a high-quality motorized pull-down screen can dramatically improve image clarity, especially with high gain surfaces designed for bright rooms. Want to learn how to avoid my mistake and select a screen that truly elevates your viewing? Let’s dive into the practical steps that will help you make an informed decision—starting with understanding the fundamentals of screen gain and technology. For a thorough breakdown, check out this guide on enhancing image quality.
Select the Right Screen Type for Your Bright Room
Start by evaluating your space. If your room has large windows or strong ambient light, opt for a fixed frame or motorized pull-down screen with high screen gain. These screens reflect more light toward you, ensuring vibrant images despite the brightness. I remember testing a cheap pull-down screen in my living room, and it sagged over time, compromising image quality. That experience taught me the importance of investing in quality for bright environments. For a comprehensive comparison, see this guide on the best screens for bright rooms.
Measure Your Space Accurately
Before purchasing, measure your projection distance and available wall space. Use a tape measure to determine the optimal size for your screen, balancing visibility and room proportions. Remember, a larger screen can enhance immersion but requires a higher gain surface to maintain brightness. I once misjudged my space, bought a too-large screen, and struggled with image clarity. Precise measurements saved me from that mistake. Check the installation guide for detailed tips.
Pick the Correct Screen Material and Gain
Choose a material designed for high brightness and contrast. High gain surfaces, typically between 1.8 and 3.0, reflect more light but can introduce hot spotting—where the center appears brighter than the edges. To mitigate this, select a screen with an even gain distribution. I experimented with a 2.5 gain surface, which made my projector images pop, but I had to angle the projector precisely to avoid hot spots. For technical details, visit this explanation of screen gain.
Install the Screen Correctly
Proper installation is crucial. Use a sturdy wall or ceiling mount, ensuring the screen is perfectly level. Follow this installation guide for step-by-step instructions. I once tried to install a screen myself and ended up with a crooked display; a level laser helped me align everything perfectly. Secure the mount tightly to prevent vibrations that can blur your image.
Fine-Tune Your Projector Settings
Adjust your projector’s brightness, contrast, and color settings to match your screen’s capabilities. In bright rooms, increasing the brightness and adjusting the gamma can significantly improve image clarity. Remember, a high gain screen reflects more light, so reduce your projector’s lumen output to avoid overexposure. I had to experiment with my projector’s settings to find the perfect balance after installing my high gain screen. For detailed calibration techniques, see this calibration guide.
Optimize Your Setup for Consistent Brightness
Consider controlling ambient light with blackout curtains or adjustable blinds to maximize contrast. Use directional lighting that doesn’t shine directly on the screen. I installed dimmable wall sconces that I can turn off during movie nights, which made a noticeable difference. Additionally, avoid placing reflective objects near the screen to prevent unwanted glare. These simple steps will ensure your high-gain screen performs at its best, providing a crisp, vibrant picture even in daylight.
By carefully selecting, installing, and calibrating your projection screen, you’ll unlock the full potential of high-gain technology in your bright room. For more in-depth advice, visit the ultimate guide on pull-down screens and gain benefits.
Even seasoned home theater enthusiasts often fall for misconceptions that hinder their setup. One such myth is that higher screen gain always means better brightness and image quality. In reality, many assume that a gain of 3.0 will deliver cinema-level clarity in any environment, but this can lead to hot spotting and uneven illumination, especially in larger screens. Instead, experts advise selecting a screen with an even gain distribution, typically between 1.8 and 2.5, to balance brightness and uniformity. For a detailed understanding of how gain impacts your image, check out this comprehensive guide on screen gain.
Keep Your System Running Smoothly with the Right Tools
Maintaining a high-quality home theater setup requires more than just initial installation; it demands regular care and the right equipment. I personally rely on a few key tools that help me keep my system in top shape. For example, I use a digital laser thermometer to monitor the temperature of my projector and AV components, ensuring they stay within optimal ranges and prevent overheating—something that can silently damage sensitive electronics over time. Additionally, I swear by a microfiber cleaning cloth and a blower brush to keep my projection screen free of dust and smudges, which can degrade image quality if left unchecked. Why do I prioritize these tools? Because consistent cleaning and monitoring extend the lifespan of my equipment and ensure I get the best possible picture every time I watch.
How do I maintain my projection screen over time?
Screen maintenance is crucial. I recommend periodic cleaning with a soft, lint-free cloth and a gentle screen-safe cleaner—never harsh chemicals. For stubborn spots, a mixture of distilled water and a few drops of isopropyl alcohol works wonders. Regularly inspecting the screen surface helps catch sagging or damage early. If your screen is motorized or fixed-frame, check the mounting hardware annually to prevent vibrations or misalignment, which can impair image quality. For more detailed guidance, explore this installation guide to ensure your setup remains pristine.
Invest in Smart Calibration Devices
One of the best investments I made was a color calibration tool like the Datacolor SpyderX. It automatically adjusts my projector’s color and brightness settings, saving me hours of manual tweaking. These devices are surprisingly affordable and straightforward to use. They help maintain consistent image quality over the years, especially as bulb brightness diminishes with age. I predict that future calibration tools will become even more intelligent, leveraging AI to automatically optimize settings based on ambient room conditions—making maintenance effortless. To get started, check out this guide on enhancing image quality for more tips.
Why choose software-based calibration?
Besides hardware tools, I also use calibration software like CalMAN or LightSpace to fine-tune my projector’s settings. These programs connect via HDMI or USB and allow precise adjustments of gamma, white point, and color balance. Regular calibration ensures my images stay sharp and color-accurate, even as components age. As technology advances, I believe these software solutions will incorporate AI-driven analysis, offering real-time adjustments for optimal performance. For a detailed comparison, see this guide on calibration techniques.
Future Trends in Home Theater Maintenance
Looking ahead, I see a trend toward fully integrated smart systems that monitor and automatically adjust your setup—think of it as having a personal AV technician at your fingertips. These systems could detect dust buildup, component overheating, or calibration drift and correct them on the fly. I recommend trying out some of these emerging tools to stay ahead of the curve. For now, a combination of manual tools and software calibration remains the best way to keep your home theater performing at its peak. Remember, consistent maintenance not only preserves your investment but also guarantees stunning visuals for years to come. For expert advice, don’t hesitate to contact us through this contact page.
The Hardest Lesson I Learned About Bright Room Projection
One of my biggest realizations was that not all screens are created equal, especially when dealing with ambient light. Investing in a high-quality high gain screen transformed my viewing experience, proving that the right surface can make or break your setup.
3 Surprising Myths About Bright Room Screens That Held Me Back
I used to believe that a gain of 3.0 was the ultimate for brightness, but I learned that excessive gain can cause hot spotting and uneven images. Balancing gain with screen type and proper setup is key to achieving vibrant, consistent visuals.
What Experts Won’t Always Tell You About Projection Surface Choices
Many overlook the importance of installation and calibration, thinking that a good screen alone will do the trick. In reality, fine-tuning your projector settings and mounting your screen correctly are crucial steps to maximizing brightness and image clarity in bright environments.
My Essential Toolkit for Bright Room Home Theaters
To keep my setup optimal, I rely on tools like a digital laser thermometer for monitoring projector temperature, a microfiber cloth for screen cleaning, and calibration software such as CalMAN. These tools help me maintain peak performance and extend my equipment’s lifespan.
Where to Go from Here
If you’re serious about elevating your bright room projection game, start by exploring high gain screens designed for ambient light. Pair that with proper calibration and ambient light control, and you’ll be amazed at the difference. For detailed guidance, check out the comprehensive strategies on enhancing image quality. Remember, the right combination of tools, techniques, and patience will lead you to a stunning home theater experience that outshines even commercial cinemas in your bright space.
5 Responses