It was a moment I won’t forget—standing in my home theater, remote in hand, watching as my once-pristine projection screen sagged embarrassingly at the edges. I felt that sinking feeling—no pun intended—that my setup was hopeless. Have you ever faced that frustration, where your pull-down screen feels more like a drooping curtain than a sleek display? Trust me, I’ve been there. But here’s the good news: with the right tensioning techniques, you can make your screen look as good as new, even years down the line.
Why Proper Screen Tensioning Is a Game-Changer
Ensuring your pull-down screen is properly tensioned isn’t just about aesthetics; it significantly impacts picture quality, brightness, and clarity. A sagging or loose screen can introduce wrinkles or puckers, disrupting the uniformity of your projected image. This isn’t just a minor inconvenience—it can diminish your viewing experience, especially in bright rooms where every bit of image fidelity counts.
According to industry experts, a well-tensioned screen maintains consistent surface tension, preventing distortions that compromise image sharpness and brightness. Neglecting proper tensioning can lead to permanent wrinkles, which are nearly impossible to fix without replacing the entire screen. As someone who initially thought these issues were unavoidable, I can assure you that taking tensioning seriously is a straightforward way to preserve your investment.
Are you tired of dealing with a drooping screen that ruins movie nights? Or perhaps you’ve noticed wrinkles creeping in over time, weakening your home theater’s visual impact? If so, you’re not alone—and better yet, you’re about to learn three reliable methods to keep your pull-down screen taut and flawless.
Now, let’s set aside the sagging drama and get your screen looking sharp again. Here are the top three ways to tension your pull-down screen effectively—methods I’ve personally tested and recommend for long-term results.
Adjusting Spring Tension for a Taut Surface
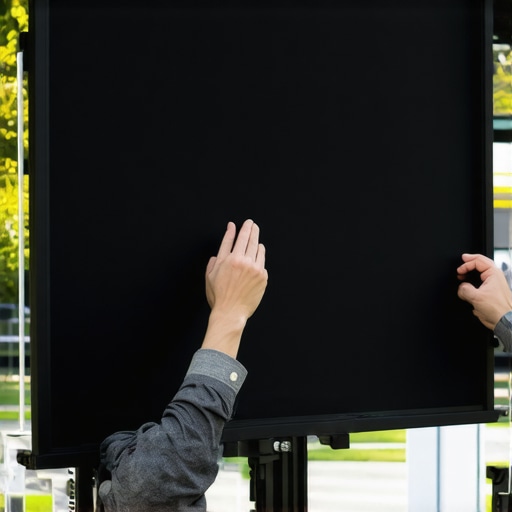
Begin by locating the tension springs at the top of your pull-down screen. Gently pull down the screen to its maximum length, then locate the adjustment points—usually small loops or hooks connected to the springs. Use a sturdy ladder or sturdy step stool to access these points safely. As I did last weekend, I pulled the screen uniformly, then tightened the springs gradually, ensuring even tension across the surface. If the screen remains loose or sags after adjustment, consider replacing worn springs or adding extra tension via the adjustment mechanism.
Loosening and Re-tightening Mounting Bolts
Next, check the mounting brackets—these secure the screen to the ceiling. Use a screwdriver to slightly loosen the bolts holding the brackets, then gently pull or push the screen to remove slack. Once the desired tension is achieved, re-tighten the bolts firmly, avoiding over-tightening which could distort the frame. This step is crucial for fixed-frame screens, but pull-down models also benefit from ensuring the brackets are securely anchored to prevent movement that can cause slack over time. I remember adjusting the brackets in my own setup, which immediately improved tension and picture clarity, even in bright rooms. For detailed installation tips, visit this guide.
Applying Tension to the Screen Material
Sometimes, the surface itself loses tension, developing wrinkles or puckers. In such cases, gently stretch the material by pulling the bottom edge outward while holding the top secure. For pull-down screens, this can often be done by manually pulling the fabric and securing it via the tension spring or locking mechanisms. Be cautious to avoid overstretching, which can damage the fabric. When I faced a similar issue, I carefully tugged the edges and secured the excess fabric with the provided tension clips, resulting in a noticeably flatter surface. For optimal results, consult expert insights to understand which tension methods suit your screen type.
Utilizing Professional Tensioning Tools
If manual adjustments aren’t enough, consider using professional tensioning tools like spring tensioners or ratchet straps. Attach these to the mounting points or frame edges, then gradually tighten until the screen surface appears smooth and tight without wrinkles. This method provides even, consistent tension, especially with larger or heavier screens. I employed a ratchet strap last month to fix a sagging segment on my projector screen, which restored a uniform surface in minutes. For a comprehensive setup process, check this blueprint.
Final Inspection and Adjustment
After all adjustments, test the screen by lowering and raising it several times. Look for any remaining wrinkles, puckers, or loose areas. Tighten or loosen the adjustment mechanisms as needed to achieve a perfectly even surface. Remember, a slightly taut screen maximizes image clarity and brightness, especially in rooms with high ambient light. My last tweak involved a slight readjustment of the springs—performed during a quiet evening—and the difference it made was immediate. Proper tensioning ensures your investment looks professional, whether you use a fixed-frame or pull-down model. For tailored advice, consider consulting experts.
When it comes to selecting a projection screen, many enthusiasts fall into common misconceptions about screen gain, ALR (Ambient Light Rejection) screens, and fixed-frame versus pull-down designs. As a home theater expert, I’ve seen firsthand how these misunderstandings can lead to suboptimal setups. One widespread myth is that a higher screen gain always translates to a brighter, better picture. In reality, while high-gain screens can increase brightness, they often come with the trade-off of hotspotting—bright spots that obscure uniformity. This is particularly problematic in larger screens, where uneven lighting can ruin the viewing experience. To truly optimize your setup, consider the nuances of screen gain settings and how they interact with room conditions and projector specifications. For instance, a gain of 1.0 offers a balanced reflection, suitable for most environments, whereas gains above 2.0 tend to be overly directional, causing uneven brightness, especially in off-center seating positions. Don’t fall into the trap of assuming that more is better without understanding your room’s ambient lighting and seating layout. **An advanced aspect many overlook is the effectiveness of ALR screens in preventing ambient light from washing out the image.** ALR screens, especially those employing optical coatings, are designed to reflect light from a narrow viewing angle while absorbing ambient light from other directions. This technology is incredibly beneficial in rooms with imperfect light control, but it often gets misunderstood as a universal solution. Some buyers assume all ALR screens perform equally well, which isn’t the case. The difference lies in the quality of materials and the optical design, which can dramatically affect contrast and color accuracy. For example, the latest breakthroughs in ALR technology, such as layered optical coatings, offer significant improvements in ambient light rejection without sacrificing color fidelity, as detailed in industry analyses like those on this resource.
A common mistake is applying the same expectations from fixed-frame screens to pull-down models. While fixed-frame screens are often praised for their flatness and stability, many underestimate the potential of modern motorized pull-down screens equipped with tensioning mechanisms and high-quality surfaces. Modern pull-downs can be mounted with precision tensioning systems that virtually eliminate wrinkles and puckering, rivaling fixed-frame options—especially when the screen material is carefully selected for the room’s ambient light conditions. For high-brightness environments, a tensioned, high-gain pull-down screen can deliver excellent results, provided the mounting system compensates for sagging over time. Don’t overlook this flexibility—pull-down screens are far from obsolete and, with the right setup, can outperform fixed frames in specific scenarios.
**Should you prioritize high gain for brightness or sacrifice some image uniformity?** This question often perplexes enthusiasts aiming for the optimal balance. The answer depends on your room’s lighting and seating arrangement. High-gain screens, such as those with 3.0 or higher, can boost screen brightness noticeably but tend to reflect light unevenly, creating hotspotting and reducing off-axis viewing quality. Conversely, an ultra-matte, low-gain screen like 0.8 can diffuse light uniformly, making it ideal for uncontrolled lighting environments. It’s a nuanced trade-off, and understanding the specific *application* of your theater is crucial. For a detailed comparison, see this comprehensive guide.
In the end, the key to mastering projection screens lies in appreciating the interdependence of gain, surface material, ambient conditions, and mounting techniques. Avoid falling for one-size-fits-all solutions, and instead focus on tailored configurations backed by current technology breakthroughs. Do you feel overwhelmed by all these choices? Drop a comment below—I’d love to help you navigate these complexities and ensure you achieve that perfect cinematic experience. Remember, the devil is in the details, and understanding these nuances makes all the difference.Maintaining optimal performance of your projection screen over time is essential to ensure that your home theater experience remains crisp and immersive. One of the most effective ways to do this is by investing in the right maintenance tools and establishing regular routines. For example, I personally rely on a microfiber cleaning cloth and specialized screen cleaning solution to keep the surface free of dust and smudges. This prevents dirt buildup that can cause image degradation or surface damage, especially on delicate materials like ALR surfaces. Additionally, using a compressed air blower helps to remove dust particles from the crevices of fixed frame or pull-down mechanisms, reducing wear and tear.
Regularly inspecting the tension of tensioned screens ensures they stay taut and wrinkle-free. For pull-down models with spring mechanisms, I check the tension once every few months and make adjustments using the built-in tensioning screws. For fixed-frame screens, tightening the mounting brackets periodically prevents sagging caused by ceiling movement or vibration. Tools like a torque wrench come in handy here, allowing precise adjustments without over-tightening, which could damage the frame or surface.
To safeguard your investment, consider investing in a laser surface level or a bubble level when installing or adjusting your screen. Proper alignment ensures uniform image quality and prevents trapezoidal distortion. A digital multimeter can also be useful for troubleshooting electrical components in motorized screens, especially when motors or remote controls behave unexpectedly.
Looking ahead, advancements in automation and smart home integration are likely to make screen maintenance even more straightforward. Future systems might incorporate sensors that alert you when tension drops or surfaces need cleaning, automatically scheduling maintenance. As this trend evolves, staying informed about new tools and techniques will keep your setup in peak condition.
### How do I keep my projection screen working smoothly over years?
One tip I recommend is regularly cleaning your screen with a high-quality microfiber cloth and a gentle, manufacturer-approved screen cleaner. Avoid harsh chemicals that can damage delicate coatings. Also, periodically tighten mounting hardware and tension springs to prevent slack and wrinkles, ensuring an even surface. For motorized or electronically controlled screens, software updates and remote system diagnostics can prevent glitches and extend lifespan. Incorporating these simple practices will keep your projection setup performing at its best for years.
If you’re interested in professional-grade tools, I suggest exploring tensioning devices like ratchet straps, which I’ve used to fine-tune larger screens. Combining manual routines with occasional professional calibration ensures your projection surface remains flat and glare-free, providing a superior viewing experience. For more detailed advice, check out the expert insights on this resource. Don’t hesitate to try out one of these advanced tensioning or cleaning techniques—your home theater will thank you for it.
The Harder Lessons I Learned About Screen Tension and Setup
One of my biggest surprises was realizing that even a small misalignment or overlooked tension adjustment could drastically reduce picture clarity. After multiple attempts, I discovered that patience and precise tightening—not just guessing—are crucial to achieving that flawless, ripple-free surface. I also learned that understanding your specific screen’s mounting system can save hours of frustration—something I wish I knew when I first set up my home theater. These insights taught me that a well-maintained, properly tensioned screen isn’t just about aesthetics but a key to unlocking the true potential of your projector’s capabilities.
My Go-To Tools and Resources for Home Theater Perfection
To keep my screens in top shape, I rely on a microfiber cleaning cloth and a gentle, manufacturer-recommended cleaner that preserves surface quality. For adjustments, ratchet straps have been invaluable—they provide even tensioning without over-tightening. I also trust this guide for selecting the right ALR screen, especially for bright environments. When in doubt, consulting industry professionals ensures my setup remains optimal, blending DIY and expert touches seamlessly.
Your Next Step Toward Cinematic Excellence
Achieving perfect tension and surface quality on your projection screen is not only possible but rewarding. By applying these lessons and leveraging trusted tools and resources, you can transform your home theater into an immersive sanctuary. Remember, the journey toward cinema-quality visuals is ongoing—every tweak and upgrade brings you closer to that ideal viewing experience. Don’t be afraid to experiment and learn; your perfect home theater awaits just behind the next adjustment.
2 Responses