Ever set up a home theater, only to realize that the picture is washed out when the lights are on or the blinds are open? I remember countless nights of frustration, trying to make the screen pop in my bright living room, only to settle for dull, grainy images. It was a lightbulb moment when I finally understood that not all projection screens are created equal—especially for bright environments. If you’ve faced similar struggles, you’re not alone. Luckily, today I’ll guide you through a game-changing journey to find the best Top ALR & Fixed Frame Projection Screens for 2024 that can transform your space into a clarity haven, even in bright rooms.
Why Bright Rooms Need Special Screens
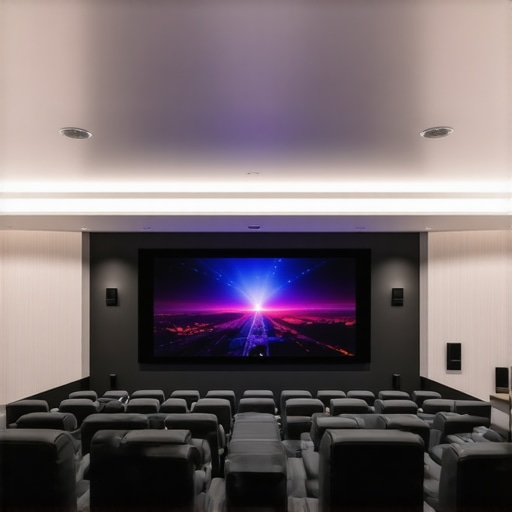
Bright rooms pose a unique challenge for home theater enthusiasts. Standard screens often struggle to deliver vivid images because ambient light diminishes contrast and washes out colors. That’s where high-gain and ALR (Ambient Light Rejection) screens come into play. These screens are designed to reflect light directly back to the viewer, making the picture appear brighter and more vibrant, even with the lights on. But choosing the right one isn’t as simple as picking the most expensive or the one with the highest gain. It’s about understanding the technology and how it fits your specific space.
Early on, I made the mistake of assuming that a high-gain screen would automatically solve my brightness issues. Turns out, some screens with too high a gain can create hot spots and reduce viewing angles. I learned the hard way that understanding screen gain and how it impacts your image quality is crucial. You can check out understanding screen gain for a detailed explanation. The right screen can make your room look like a real cinema, even in daylight, without the need for blackout curtains.
Are ALR Screens Actually Worth the Hype?
This is the question I hear all the time. Some folks worry that ALR technology is just a marketing gimmick. Well, I was skeptical too—until I installed a quality ALR fixed frame screen in my bright room. The difference was night and day. The contrast improved dramatically, and colors became richer. It’s not just hype; it’s a real breakthrough. For a deeper dive into the latest ALR screen innovations, check out ALR Screen Technology Breakthroughs for 2025.
So, if you’re tired of dim, washed-out images and want to enjoy your favorite movies and shows in any lighting condition, stay with me. I’ll help you decode what makes the best screens for bright rooms and how to pick the perfect one for your space. Ready to ditch that dull picture? Let’s get started!
Start with the Right Screen Technology
Choosing the correct screen is the foundation of crisp, vibrant images in bright rooms. For high ambient light environments, focus on ALR (Ambient Light Rejection) screens that reflect projected light directly back to your eyes, minimizing washout. When I replaced my standard screen with a high-quality ALR fixed frame model, the difference was immediate—colors popped, and contrast improved even with the living room lights on. To understand how screen gain influences brightness and clarity, check out this guide on screen gain. Selecting a screen with appropriate gain, typically between 1.0 and 2.2, ensures your room’s ambient light doesn’t drown out the picture.
Measure Your Space and Light Conditions
Before making a purchase, measure your room’s dimensions and note the typical lighting conditions. Is your space naturally bright, with large windows or strong overhead lights? Or can you control the lighting? For bright rooms, opt for screens with higher gain (around 1.8 to 2.2) that reflect more light back to your eyes. I once installed a 2.2 gain ALR screen in my sunlit living room; the result was stunning clarity despite the daylight pouring in. Remember, high-gain screens can create hot spots if not properly positioned, so precision in setup matters. For help with choosing the right type, review comparison of top ALR screens for bright rooms.
Position Your Screen for Optimal Reflection
Placement is critical. Position your screen perpendicular to your projector’s throw path and avoid reflective surfaces that could bounce ambient light onto the screen. Use adjustable mounts to fine-tune the angle, ensuring maximum light rejection. During my first installation, I initially placed the screen too high, causing glare from windows. After lowering and angling the screen slightly, the picture became sharper, with better contrast. Check out this guide on screen types and placement for more tips.
Install with Precision
A proper installation makes all the difference. Use a level and measuring tape to mount your fixed frame exactly where you want it. Ensure the screen is taut and flush against the wall or frame. I once had to redo my mounting after a crooked install caused uneven tension, which distorted the image. For detailed steps, see installation guide for fixed frames. Double-check the projector alignment as well—an off-axis image reduces clarity and can cause uneven focus.
Fine-Tune Your Setup for Bright Conditions
Once installed, calibrate your projector and screen settings for optimal brightness and contrast. Increase the projector’s contrast and brightness settings gradually, and use a calibration disc or software to fine-tune the image. Remember, in bright rooms, you want the image to be vivid but not washed out. I found that adjusting the projector’s contrast to a higher setting, combined with the high-gain ALR screen, yielded a cinema-like experience during daylight hours. For advanced calibration techniques, explore this guide on image optimization.
Many home theater enthusiasts, even those who have done their research, fall prey to misconceptions that can hinder their viewing experience. Let’s dig deeper into some nuanced truths and myths that often trip people up when choosing and setting up projection screens, especially for bright rooms. One widespread myth is that a higher gain screen always equals better brightness. In reality, screens with very high gain (above 2.0) tend to create hot spots—bright spots in the image where the light is concentrated—and drastically narrow the viewing angle. This means that viewers off to the side will notice a duller picture, defeating the purpose of a wide, immersive setup. Experts warn that optimal gain for bright rooms usually stays between 1.8 and 2.2, which balances brightness and uniformity. For more detailed insights, check out this guide on screen gain.
Another common mistake is assuming all ALR (Ambient Light Rejection) screens are the same. Many buyers are swayed by marketing hype, thinking that any ALR screen will work in their bright room. But the technology varies significantly. Some screens are optimized specifically for high ambient light conditions, while others are more suitable for controlled dark environments. The key is to look for screens with specialized microstructures that direct ambient light away from the viewer’s eyes, rather than merely reflecting projected light. For a deep dive into the latest ALR innovations, explore this article on ALR advancements.
Many overlook the importance of placement and setup precision, assuming that once the screen is mounted, the job is done. However, even a high-quality fixed frame or pull-down screen can underperform if not installed correctly. Slight misalignments or crooked mounting can cause differential focus, uneven brightness, or unwanted glare. For advanced setup tips, review this installation guide. Proper calibration of the projector’s angle and brightness settings is equally critical to maximize the benefits of your chosen screen.
Finally, many believe that the projector’s brightness alone determines the clarity of the picture. While lumens are important, they are not the whole story. The contrast ratio, color accuracy, and the screen’s reflective properties all play vital roles. A projector with high lumens paired with a poor screen can still produce washed-out images. Conversely, a well-matched setup with a good screen can deliver stunning clarity even with moderate brightness. For advanced calibration techniques, see this comprehensive calibration guide.
Have you ever fallen into this trap? Let me know in the comments. Understanding these nuances can save you time and money, and most importantly, elevate your home theater experience to professional levels. Remember, the right screen technology combined with proper setup makes all the difference in achieving bright, vibrant, and immersive images—no matter how much ambient light you have to contend with.
How do I keep my projection screen performing flawlessly over time?
Maintaining your projection screen is crucial to ensure it continues delivering sharp, vibrant images. One of my go-to tools is a microfiber cleaning cloth, which I use regularly to gently remove dust and fingerprints without scratching the surface. For stubborn smudges, I recommend a mild, non-abrasive cleaner diluted with water, applied sparingly to avoid over-saturation. Regular cleaning prevents dirt buildup that can dull the image and cause uneven reflections. Additionally, using a compressed air canister helps clear off any dust particles from the edges or mounting hardware, especially for fixed frame screens. Over time, environmental factors like humidity and temperature fluctuations can affect your screen’s integrity. Installing a dehumidifier in your home theater space can help prevent mold and warping. If your screen is motorized or pull-down, lubricating the moving parts with a silicone-based lubricant ensures smooth operation and prevents mechanical wear. I personally use a lubricant recommended by professional installers, which you can find detailed in the installation guide. For digital calibration and ongoing image optimization, software like CalMAN or ColorMunki is invaluable. These tools allow precise adjustments to contrast, color, and gamma, keeping your setup at peak performance as ambient conditions change. As projection technology advances, expect smart calibration systems integrated into projectors to become more common, simplifying maintenance even further. In the future, automated sensor-based calibration might monitor and adjust your display settings in real-time, maintaining perfect image quality with minimal effort.
What tools do I recommend for maintaining my projection setup?
Beyond cleaning supplies, I rely on a few specialized tools to keep my home theater in top shape. A high-quality laser distance meter helps me fine-tune projector placement and screen alignment, ensuring maximum image sharpness and uniformity. For calibration, the ColorMunki Display provides accurate color profiling, essential for consistent image quality, especially when switching between different content types. A calibration disc like Spears & Munsil’s HD Benchmark is also a must-have for verifying contrast and resolution. For physical maintenance, I use a silicone lubricant for projector mounts and motorized screens, preventing squeaks and ensuring smooth operation. An anti-static brush is handy for cleaning delicate optical components, like lenses and projector filters, which can accumulate dust over time. I also recommend installing a home automation system that can adjust projector brightness and contrast based on ambient light sensors, reducing manual calibration efforts. As technology evolves, expect these tools to become more integrated, with AI-driven diagnostics and maintenance alerts. To stay ahead, periodically review your setup with resources like professional setup guides and keep your equipment updated. Try implementing a regular maintenance schedule with these tools, and you’ll enjoy consistently stunning images for years to come.
The Hardest Lesson I Learned About Projection Screens in Bright Rooms
One of my biggest surprises was realizing that not all screens are created equal—especially when I wanted vibrant images in a sunlit living room. I initially believed that a higher gain meant better brightness, but I quickly learned that too high a gain leads to hot spots and narrow viewing angles. The real breakthrough came when I discovered that specialized ALR (Ambient Light Rejection) screens can transform even the brightest settings into immersive cinemas. Understanding these nuances was a game-changer, saving me from expensive mistakes and endless frustration. My biggest insight? Tailor your screen choice to your specific lighting conditions—it’s the key to stunning clarity in bright environments.
My Essential Toolkit for Bright Room Projection
- Understanding Screen Gain: This guide helped me grasp why a gain of 1.8 to 2.2 balances brightness and uniformity, avoiding hot spots and wide viewing angles. Check it out here.
- Best ALR Screens for 2024: The latest advancements in ALR technology are remarkable. I trust this comparison review to find the right fit for bright rooms.
- Installation & Calibration: Proper placement and calibration are crucial. The installation guide helped me perfect my setup, ensuring optimal reflection and focus.
- Image Optimization Techniques: Fine-tuning contrast and brightness with calibration software maximized my picture quality. This technique made a noticeable difference.
The Future of Bright Room Projection Is Bright and Clear
With the right technology, setup, and ongoing maintenance, your home theater can shine even in the sunniest spaces. Regular cleaning with a microfiber cloth and periodic calibration keep the picture crisp and vibrant. As projector and screen tech advance, automated calibration and smart systems will soon make perfect images effortless. Investing in top ALR and fixed frame screens is more than a purchase—it’s a commitment to stunning clarity, regardless of ambient light. Imagine watching your favorite films with the brightness and contrast that truly do them justice, day or night. Your bright room can be your theater—just choose the right tools and setup for a cinematic experience that feels just right.
The Hardest Lesson I Learned About Projection Screens in Bright Rooms
- Don’t assume higher gain always means better brightness—balance is key to avoid hot spots and limited viewing angles.
- Not all ALR screens are equal; choose ones tailored specifically for bright environments for best results.
- Proper installation and calibration are often overlooked but are essential to maximize your screen’s performance.
- Regular maintenance, including cleaning and software calibration, keeps your picture sharp and vibrant over time.
- Technology is evolving rapidly—stay informed about the latest innovations in ALR and high-gain screens to keep your setup cutting-edge.
My Essential Toolkit for Bright Room Projection
- Understanding Screen Gain: Explains how to select the right gain for your space. Read more here.
- Best ALR Screens for 2024: Compare top models with advanced technology. Check out this comparison.
- Installation & Calibration: Use step-by-step guides to perfect your setup. See this guide.
- Image Optimization Techniques: Fine-tune your projector with professional calibration tools. Learn more here.
Your Turn to Try Brightening Your Home Theater Experience
Don’t let ambient light steal your cinematic moments. With the right high-gain, ALR, and fixed frame screens, you can enjoy vivid, crisp images even in daylight. Now that you know the secret sauce, what’s stopping you from upgrading your home theater? Dive into the latest technology, follow proven setup tips, and transform your bright room into a true cinema. Your perfect picture awaits—go make it happen!
Have you ever struggled with choosing the right projection screen for a bright room? Share your experiences below and let’s learn together!
2 Responses