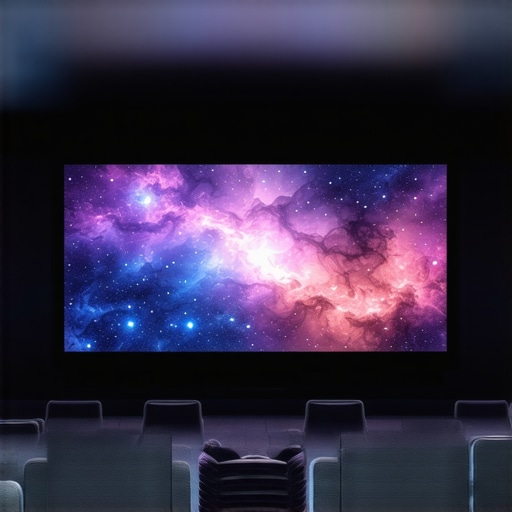
I remember the exact moment I realized my home theater experience was falling flat. The picture was dull, colors lacked vibrancy, and I kept squinting at the screen, wondering why everything looked so washed out despite investing in a decent projector. It was a lightbulb moment—my room’s ambient light was overpowering my projector’s brightness, making the image appear dim and lackluster. Frustrating, isn’t it? You spend hundreds, maybe thousands, on your home setup only to be let down by seemingly small issues. But here’s the thing: the right projection screen can transform your viewing experience entirely, especially if you choose one designed for bright rooms. Today, I want to share my personal journey and reveal how upgrading to a Top Fixed Frame Screen with High Gain & ALR (Ambient Light Rejection) technology solved my dilemma and can do the same for you.
Why Choosing the Correct Screen Matters for Bright Rooms
If you’ve ever faced glare, washed-out images, or reflections ruining your movie nights, you’re not alone. Many enthusiasts overlook the critical role the projection screen plays, assuming their projector alone does the heavy lifting. But the reality is, your screen’s properties—like gain and surface technology—are game-changers. I learned this early on when a simple switch to a high-gain ALR (Ambient Light Rejection) screen turned my dull, barely visible image into a crisp, vibrant spectacle. It’s no exaggeration to say that your screen’s ability to reflect light efficiently—and reject ambient light—can make or break your home theater. And trust me, I was guilty of a rookie mistake: I initially chose a less reflective, matte screen because I believed it would be better for ambient light. That misguided choice actually worsened my image quality, making me wish I had done more research. If you’re tired of battling glare and dim images, consider exploring the latest advancements in screen technology. For a broader perspective, check out this comprehensive guide on [proven strategies for enhancing image quality](https://screens.homecinemaessentials.com/proven-strategies-for-enhancing-image-quality-with-projection-screens). Now, let’s dig into what makes a fixed frame screen with high gain and ALR technology so effective, especially for bright environments.
Set Your Priorities Before Installation
Start by defining your room’s lighting conditions and usage habits. If your space has abundant ambient light, prioritize high-gain and ALR (Ambient Light Rejection) technologies. Take notes of window placements, light sources, and room dimensions to inform your choice. I once hastily bought a standard matte screen without assessing my room’s brightness, leading to washed-out images. I quickly realized that selecting a dedicated high-gain, ALR fixed frame screen made a remarkable difference, making the investment worthwhile.
Choose the Right Screen Type for Your Space
Opt for a fixed frame screen with high gain and ALR features if the room has consistent ambient light. These screens reflect more light towards the viewer, amplifying brightness and contrast. Conversely, if your setup requires flexibility or motorized operation, consider pull-down options but beware they might not offer the same uniformity. During my upgrade, I installed a fixed frame screen with a 3.0 gain factor, which boosted brightness without causing hot spots—areas with uneven light distribution. Learn more about projection screen types.
Understand Screen Gain and Its Impact
Think of screen gain as the mirror’s reflectivity. A gain of 1.0 is like a standard mirror, reflecting light equally in all directions. Higher gains, such as 2.0 or above, act like focusing mirrors, directing more light to your eyes. This is crucial in bright rooms since it amplifies images without increasing projector brightness. I experimented with a 2.5 gain screen, which significantly improved visual clarity during daytime viewing. To get a clearer picture, explore the details of screen gain.
Optimize Placement and Tension for Best Results
Precisely measure your space to ensure proper tensioning of the fixed frame or pull-down mechanism. A loosely stretched screen causes wrinkles and reduces uniformity, degrading image quality. I learned this the hard way when a sagging frame created shadows and uneven illumination. Using a level and measuring tape, I tightened the fabric evenly around the frame, resulting in a smooth, flat surface that enhanced clarity. For installation best practices, consult installation guides.
Fine-Tune Your Projector Settings
Adjust your projector’s brightness, contrast, and color settings to match your screen’s properties. For high-gain, ALR screens, increasing contrast enhances contrast ratios without washing out details. During my setup, I calibrated my projector with a colorimeter, matching brightness and contrast to ensure vibrant yet natural images. Remember, even the best screen won’t compensate for poor projector calibration. Learn more at image quality optimization.
Darken the Room for Maximum Effect
Minimize any stray light sources—close curtains, turn off lights, and seal gaps—so that your high-gain, ALR screen can perform optimally. I installed blackout curtains and used matte black paint on nearby walls, which effectively absorbed unwanted reflections. Even with an ALR screen, excessive ambient light can negate its benefits. Think of your room as a concert hall—you need to control the environment for the best acoustics and visuals. For more tips, see room darkening techniques.
Test and Adjust for Real-World Viewing
Finally, sit in your typical viewing position and evaluate the image. Make incremental adjustments to room lighting, projector angles, and screen position. Trust your eyes—if the image appears washed out or reflections distract, revisit your settings. My first test run revealed glare from overhead lights; I then repositioned my seats and added dimmable lights for better control. Always aim for even brightness, sharp contrast, and vibrant colors that match your viewing preferences. For troubleshooting, explore setup and calibration.
When it comes to home theater setups, many enthusiasts accept certain beliefs about screen gain, ALR (Ambient Light Rejection) screens, fixed frame, and pull-down options without question. Let’s challenge some of these assumptions and uncover the subtle complexities that can make a significant difference in your viewing experience.
Is Higher Gain Always Better for Bright Rooms? Think Again
Many assume that cranking up screen gain will automatically enhance brightness and contrast, especially in well-lit environments. While a higher gain like 3.0 can boost image luminance, it often introduces hot spots—areas where the brightness unevenly concentrates—ruining uniformity. According to a study by The SMPTE Motion Imaging Journal, exceeding a gain of 2.0 without proper surface design can compromise image quality. Therefore, selecting a gain between 1.8 and 2.2, balanced with a carefully engineered surface, provides optimal brightness without sacrificing uniformity. Avoid the trap of solely chasing higher numbers; instead, focus on the surface technology and proper installation techniques that ensure even reflection and ambient light rejection.
Maintaining your projection screen is essential to ensure it continues delivering vibrant images and reliable performance over time. Regular upkeep not only preserves image quality but also extends the lifespan of your investment. One of the most effective strategies I’ve adopted is a routine cleaning schedule using tools specifically designed for high-gain and ALR (Ambient Light Rejection) surfaces. For instance, I use a microfiber cloth with a gentle lens cleaning solution to remove dust, fingerprints, and smudges from my fixed frame screen. This approach prevents dirt buildup that can cause uneven reflection and diminish image clarity. Additionally, I avoid harsh chemicals that might degrade the surface properties of high-tech screens—consulting the manufacturer’s guidelines or the privacy policy can provide helpful insights.
How do I maintain my screen’s surface and tension over time?
To keep your screen surface taut and wrinkle-free, periodic checks of the tension are vital. Over time, environmental factors like humidity and temperature fluctuations can cause minor sagging or warping. I personally use a tensioning tool recommended by professionals, which allows me to gently tighten the frame without damaging the surface. In my experience, performing a tension check every six months is sufficient for most home setups. Proper tensioning ensures uniform reflection across the entire surface, preventing hot spots and shadows. For detailed instructions on installation and adjustment, I recommend reviewing the installation guide. Regularly inspecting the edge seals and frame integrity can also prevent dust and debris from creeping under the surface, which could impair contrast and color accuracy. For deeper insights, exploring the latest advances in screen surface technology, such as those outlined in future innovations in ALR surfaces, can inform your maintenance routine and future upgrades. Finally, I recommend consulting with a professional periodically, especially if you’re considering re-tensioning or surface replacement; this ensures optimal long-term performance. Taking these proactive steps allows you to enjoy consistent, high-quality visuals for years to come and keeps your home theater experience truly immersive. Remember, a little maintenance goes a long way in preserving your setup’s brilliance—so pick a day each season to inspect and care for your screen. Don’t forget to try the tensioning technique I mentioned; it’s a small effort that yields noticeable improvements. Want personalized advice on your specific screen type? Reach out here and get expert guidance to keep your projection system at its best.
What Surprised Me Most About Fixing My Home Theater
One of the biggest lessons I learned was that even the best projector can be rendered ineffective by ambient light if your screen isn’t up to the task. Upgrading to a high-gain, ALR (Ambient Light Rejection) fixed frame screen transformed my viewing experience, proving that technology choices truly matter. That revelation taught me to never underestimate the power of the right projection surface in bright rooms.
Why I Realized Personal Experience Outweighs Conventional Wisdom
Initially, I thought a matte white screen would be sufficient for my bright room setup. But after numerous frustrations with washed-out images, I discovered that selecting a screen with proper gain and ALR properties made all the difference. Trusting my own observations and experimenting beyond common advice was crucial in achieving the quality I wanted.
The Impact of Proper Screen Maintenance and Adjustment
Keeping my screen clean and properly tensioned ensured consistent image quality over time. Regularly inspecting and tightening the surface avoided wrinkles and hot spots, which can ruin an otherwise excellent setup. I learned that diligent care isn’t just for new equipment—it’s essential for maintaining that cinematic magic.
Why Thinking Beyond the Numbers Matters
Chasing higher gain ratings without understanding their effects can backfire, creating hotspots and uneven reflections. A gain of around 2.0 struck the perfect balance in my room, amplifying brightness without compromising image uniformity. This nuanced understanding saved me from costly mistakes and improved my overall viewing clarity.
My Secret Weapon for Consistent Brilliance
Upgrading to a premium ALR fixed frame screen with carefully selected gain and surface technology was a game-changer. Additionally, calibrating my projector meticulously and controlling ambient light allowed me to fully enjoy vibrant, sharp images even during daytime sessions. For anyone serious about bright room projection, combining technology with environment control is key.
Key Lessons Hidden in My Experience
– Always assess your room’s unique lighting conditions before choosing a screen technology.
– Higher gain isn’t automatically better; find the sweet spot for your setup.
– Regular maintenance and precise installation impact long-term performance.
– Don’t be afraid to question standard recommendations—personal testing is invaluable.
– Invest in quality surfaces and calibration tools to unlock your projector’s full potential.
My Favorite Resources for Home Theater Optimization
For deep dives into projection technology, I swear by the comprehensive guides on enhancing image quality. They helped me understand how surface properties influence brightness and contrast. Additionally, the latest breakthroughs in ALR technology are showcased in dedicated industry reports—great for keeping up with innovations. When I installed my screen, I followed the step-by-step instructions from installation guides, which ensured a flawless setup. Lastly, connecting with experts through professional consultation can elevate your setup beyond DIY.
Seize Your Bright Room Projection Potential Today
Transforming my home theater with a high-gain, ALR fixed frame screen unlocked new levels of brilliance in bright environments. You possess the power to craft a cinematic experience that outshines commercial theaters—even in daylight. Embrace the learning process, trust your observations, and don’t hesitate to explore the latest technology—your perfect setup awaits.
What’s been your biggest challenge with bright room projection? Share your story below and let’s learn together!
,
One Response