Ever spent hours tweaking your home theater setup only to be disappointed by dull images, washed-out colors, or glare that makes watching a chore? I’ve been there. That lightbulb moment hit me when I realized that not all screens are created equal—especially when dealing with bright rooms or high ambient light. My first attempt at a DIY home theater was a disaster, with washed-out images and constant frustration. It was only after digging into the mysteries of ALR (Ambient Light Rejection) screens and understanding screen gain that I finally turned my space into the cinematic oasis I’d dreamed of.
Why Your Screen Choice Can Make or Break Your Viewing Experience
Choosing the right projection screen isn’t just about size or price. It’s about understanding how different screens react to ambient light and how screen gain influences brightness and clarity. I learned this the hard way—initially, I picked a budget screen without considering its gain or how it handled my bright living room. The result? A blurry, washed-out picture that made me regret every penny spent. But once I knew what to look for, I upgraded to an ALR screen with the right gain, and everything changed. My clarity improved, colors popped, and I finally felt immersed in my movies. If you’re tired of the same old blurry images or glare, I promise that mastering screen gain and ALR technology can be your game-changer. Want to know more? Check out how to choose the best ALR screen with expert insights and tips.
Is Screen Gain Really That Important?
Absolutely. Early in my setup journey, I made the mistake of ignoring screen gain—thinking bigger was better. Turns out, higher gain screens reflect more light, making images brighter in well-lit rooms, but they can also introduce hot spots and reduce uniformity if not chosen carefully. Trust me, understanding the nuances of screen gain is critical. A low gain screen might look dull, while a high gain one can give you that vibrant, punchy picture you crave. It’s all about finding the right balance for your space. Curious? Dive deeper into how screen gain and ALR technology can dramatically improve your home theater experience by exploring this detailed guide on understanding screen gain.
If you’ve faced the frustration of watching movies in a bright room with poor contrast or glare, you’re not alone. Many enthusiasts make simple mistakes early on—like choosing a screen that doesn’t suit their environment—and it costs them a lot of time and money. But the good news? With the right knowledge, you can avoid those pitfalls. In the next sections, I’ll walk you through practical, proven strategies to select, install, and optimize your projection screen for maximum clarity and brightness, no matter your room’s lighting conditions. Ready to transform your home theater? Let’s get started!
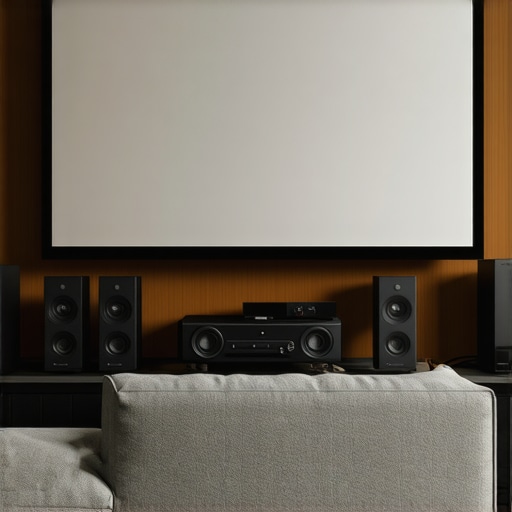
Set Your Screen Height and Position Carefully
When I first installed my new ALR screen, I made the mistake of mounting it too high, which caused reflection issues and compromised viewing angles. To avoid this, measure your seating area and determine the optimal eye level, then position the screen so it’s directly in front of the main seating spot. Use a level to ensure it’s perfectly aligned. This straightforward step prevents distortion and ensures everyone gets a clear view, especially in bright rooms where glare can be a problem. For detailed installation tips, check out the fixed frame screen installation guide.”} ,{
Many home theater enthusiasts fall into the trap of oversimplifying their projection screen choices, believing that bigger or more expensive always means better. In reality, there are nuanced pitfalls that can sabotage your setup if you’re not aware. One of the most overlooked aspects is the misconception that higher screen gain always equates to a brighter picture. While higher gain screens do reflect more light, they can introduce hot spots and uneven brightness, especially if not chosen carefully. Trust me, understanding these subtleties can save you from costly mistakes and improve your viewing experience dramatically.
Another common myth is that ambient light rejection (ALR) screens are a one-size-fits-all solution. Many assume that simply buying an ALR screen will instantly enhance contrast and clarity regardless of room conditions. However, different ALR screens are optimized for specific environments and projections angles. Picking the wrong type can lead to subpar performance, especially if you don’t consider your room’s unique lighting and viewing angles. For a detailed understanding of which ALR screen fits your space, explore expert insights on selecting the right ALR screen.
Why Do Some Advanced Setups Fail Despite Using Top-Quality Screens?
Often, even advanced setups falter because of improper calibration or installation errors—not the screen quality itself. For instance, misaligned screens or incorrect height positioning can introduce glare and distort images, negating any technological benefits. Additionally, neglecting the importance of screen material and gain in relation to your projector’s lumens can lead to washed-out images or poor contrast. This is why I recommend thoroughly reviewing detailed guides like fixed frame screen installation tips to ensure precise setup.
Furthermore, many enthusiasts overlook the impact of screen size relative to room dimensions, which can cause viewing discomfort and reduce immersion. Always aim for a screen size that complements your space; excessively large or small screens can diminish the overall experience. Remember, the goal is a balanced picture that fits naturally within your environment, not just the biggest or most expensive option available. Have you ever fallen into this trap? Let me know in the comments!
Finally, don’t forget to consider the subtle but critical role of screen material and surface texture. A matte surface might be perfect for bright rooms, but it could dampen contrast in darker environments. Conversely, a high-gloss surface can boost brightness but might introduce glare. Experimenting with different materials or consulting expert advice can make a big difference. For a comprehensive breakdown of materials and surface textures, check out comparison of projection screen types.
Keeping your projection screen in top condition requires more than just occasional cleaning; it involves using the right tools and following a maintenance routine that ensures longevity and optimal performance. Over the years, I’ve tested various equipment and methods that have proven invaluable in maintaining my home theater setup, especially when dealing with high-gain and ALR screens that are sensitive to dust and scratches.
Invest in a Quality Screen Cleaning Kit
My go-to tool is a dedicated projection screen cleaning kit. I prefer kits that include a microfiber cloth and a gentle, alcohol-free cleaning solution specifically formulated for matte or high-gloss surfaces. I use this regularly—at least once a month—to remove dust, fingerprints, and smudges. Avoid harsh chemicals or abrasive cloths, which can damage the surface or degrade the reflective coating. Proper cleaning is crucial, especially for screens with surface textures that can trap dust, affecting image clarity over time.
Use a Soft Brush or Vacuum for Dust Removal
For routine dust removal, I rely on a soft brush attachment on my vacuum cleaner. Gently sweeping the surface prevents dust buildup that can cause speckles or reduce contrast. This method is particularly effective for larger fixed-frame screens, which are less accessible for wiping. Consistent dust management preserves the integrity of the screen material and ensures a sharp, clear image during every viewing session.
Monitor and Adjust the Screen’s Environment
Maintaining a stable environment is essential. I recommend using a dehumidifier in humid climates to prevent moisture buildup, which can warp or degrade the screen material. Keep the room free of airborne pollutants and avoid touching the screen surface with bare hands. Installing a dust cover or protective cloth when not in use can further extend the lifespan and keep dust and debris at bay. Regularly inspecting the mounting hardware and alignment also helps prevent sagging or distortion, especially after long periods of use or during seasonal changes.
Leverage Software and Calibration Tools
While physical tools are vital, I also recommend periodic calibration using software like CalMAN or LightSpace. These tools help fine-tune your projector’s settings, ensuring the brightest and sharpest image possible. Proper calibration reduces the strain on your screen, especially with high-gain types that reflect more light, and maintains color accuracy over time. For best results, combine calibration with professional advice, especially if you notice fading or uneven brightness, which could indicate a need for deeper maintenance or component replacement.
Future Trends in Screen Maintenance
Looking ahead, I believe advancements in self-cleaning coatings and anti-static materials will revolutionize screen maintenance. Manufacturers are experimenting with nanotechnology to create surfaces that repel dust and fingerprints naturally, reducing the need for manual cleaning. Additionally, smart calibration systems integrated with AI could automatically optimize image quality based on ambient conditions, making ongoing maintenance even easier.
How do I maintain my projection screen over time?
The key is consistency. Regularly cleaning with the right tools, controlling environmental factors, and calibrating your projector ensure your screen continues to produce stunning images for years. Don’t forget to check the ultimate blueprint for professional projection screen setup for detailed tips on installation and ongoing care. Try implementing a monthly cleaning routine and keep an eye on environmental conditions to preserve your investment.
The Hardest Lesson I Learned About Projection Screens in Bright Rooms
One of the toughest truths I faced was realizing that a high-end projector alone doesn’t guarantee stunning images. Without the right screen, ambient light, and gain considerations, even the best projector can fall flat. I learned this the hard way—spending hundreds on equipment only to be disappointed by washed-out visuals and glare. The game-changer was understanding how screen gain impacts brightness and clarity, especially in my bright living room. This insight transformed my setup and can do the same for you.
Why You Should Choose Your Projection Screen Carefully
Many enthusiasts overlook how crucial screen material and gain are to image quality. A screen with the right gain can make your projector’s light work harder and deliver vibrant images without sacrificing contrast. I now prioritize screens that match my ambient light conditions and project lumens. It’s a delicate balance—too high gain and you risk hot spots; too low and images look dull. For tailored advice, I recommend checking out understanding screen gain to ensure your setup hits the sweet spot.
Don’t Fall for These Common Projection Screen Myths
Early in my journey, I believed that bigger screens were always better. Turns out, size without regard to room dimensions or gain can cause discomfort and image distortion. I also thought all ALR screens are created equal; the truth is, different environments require different types. My biggest lightbulb moment was realizing that proper calibration, installation, and surface material are just as vital as choosing the right screen. These lessons kept me from costly mistakes and helped me craft a truly immersive home theater experience.
Investing in Your Screen Maintenance Pays Off
Maintaining your projection screen isn’t just about cleaning—it’s about protecting your investment. I’ve found that using a microfiber cloth and gentle cleaning solutions extends the life of my high-gain and ALR screens, keeping images crisp and colors vibrant. Regular dust removal and environmental control, like using a dehumidifier, prevent damage and ensure consistent performance. For detailed tips, check out professional setup tips to keep your screen in top condition.
Embrace the Future of Projection Screens
Innovations like self-cleaning coatings and smart calibration tools are on the horizon, promising easier maintenance and better performance. I’m excited about nanotechnology that repels dust and glare, making upkeep simpler. As these advancements become mainstream, your home theater can stay pristine with minimal effort. Staying informed and adapting to new tech will allow you to enjoy cinema-quality images for years to come.
Insider Wisdom for the Serious Home Theater Enthusiast
- High gain isn’t always better: I used to think more reflection meant brighter images, but it can cause uneven lighting and hot spots. Finding the right gain for your space is crucial.
- ALR screens are environment-specific: Not all ALR screens work well in every room. Matching the right type to your ambient light conditions makes a huge difference.
- Calibration is key: Even the best screen can underperform if not properly calibrated. Invest in software or professional help for optimal results.
My Essential Toolkit for Projection Perfection
- Projection screen cleaning kit: A microfiber cloth and alcohol-free cleaner keep your screen spotless without damage.
- Soft brush and vacuum attachment: Routine dust removal prevents speckles and maintains contrast.
- Environmental controls: Humidifiers, dehumidifiers, and dust covers extend your screen’s lifespan.
- Calibration software: Tools like CalMAN or LightSpace help fine-tune your projector’s image for maximum clarity.
Your Turn to Elevate Your Home Theater
By understanding the nuances of screen gain and ALR technology, you can craft a setup that rivals commercial theaters—even in bright rooms. Don’t settle for mediocre visuals when your home theater can deliver stunning, vibrant images with the right choices. Invest time in selecting and maintaining your projection screen, and enjoy the cinematic experience you deserve.
What’s been your biggest challenge in optimizing your projection screen? Share your story below—I’d love to hear your journey!
4 Responses
I completely relate to the challenges of choosing the right projection screen, especially in rooms with a lot of ambient light. When I initially set up my home theater, I overlooked the importance of screen gain and went for a larger, cheaper screen. The result was a washed-out picture that ruined movie nights. Learning about ALR screens and the ideal gain for my space made a huge difference; now, images are vibrant even during the daytime. I’ve found that proper placement and calibration are just as critical—mounting the screen at eye level and using calibration tools like CalMAN really helped sharpen the picture. Has anyone experienced issues with hot spots in high-gain screens, and how did you address them? I’m curious whether adjusting angle or using specific materials can help reduce uneven brightness. Overall, it’s fascinating how much technological nuance goes into creating the perfect setup. Any tips on balancing screen size with room dimensions for maximum immersion?
Reading through this post really resonates with my own experience in setting up a home theater. I initially underestimated the importance of careful placement and screen gain, which led to a lot of frustration with glare and washed-out images during daytime viewing. Once I switched to a high-quality ALR screen with appropriate gain for my room, the difference was night and day—colors became more vibrant, and glare was significantly reduced. I also found that mounting the screen at eye level and ensuring it’s perfectly aligned helps avoid distortions and hot spots. Has anyone experimented with different surface textures or materials to further reduce glare or improve contrast? I’m curious about how surface choice can complement ALR and gain specs in practical setups. Also, how do you balance screen size to avoid overwhelming a room but still achieve immersive viewing? I’d love to hear more tips on optimizing room layout and setup for maximum picture quality.
This post hits home for me, especially the part about proper calibration and placement. I remember spending weeks trying to get the perfect picture, only to realize that even high-gain screens need careful positioning to avoid hot spots. I’ve noticed that adjusting the viewing angle slightly can make a huge difference in uniformity. It’s fascinating how such subtle tweaks can elevate the entire experience.
One thing I’ve learned through my own setup is that environmental factors like ambient light sources—especially windows—can severely impact contrast and color richness. Investing in blackout blinds and strategic lighting can complement the screen’s technology, making even older projectors look remarkably vibrant.
Has anyone experimented with using different mounting angles or wall textures to further improve picture uniformity? I’m curious about small adjustments that have worked for others in optimizing their home theaters. Sharing these insights can save fellow enthusiasts a lot of headaches and cost.
I’ve been experimenting with different projection screens and have found that surface texture really makes a noticeable difference in contrast and glare. For bright rooms, a matte surface seems to minimize reflections, but it can sometimes dull the image, especially in darker scenes. On the other hand, a high-gloss surface boosts brightness but tends to introduce glare, which can be distracting. I’ve read that some high-end screens now incorporate anti-static and self-cleaning coatings, which not only help with maintenance but also improve overall image quality. I’m curious, has anyone tried different surface textures in similar lighting conditions? How did it impact your viewing experience? Also, I struggle a bit with choosing the right size; balancing immersive viewing without overwhelming the room. Any tips from those who have optimized their room dimensions and screen size for the best comfort and image quality? Would love to hear your insights!”