I remember the moment clearly. After spending hours assembling my home theater, I finally turned on the projector only to be met with a washed-out, dull image. The bright sunlight streaming through the windows was sabotaging my viewing experience. Frustration set in, and I realized I had overlooked a crucial element: choosing the right screen technology for my environment. That lightbulb moment led me down a path of discovery about ALR (Ambient Light Rejection) and fixed frame screens, which have transformed my setup—and I want to share that journey with you.
Why Bright Rooms Demand Better Screens in 2024
Most people don’t realize how much their environment impacts picture quality. Bright rooms are the norm rather than the exception, especially in open-concept homes or spaces with large windows. Without the right screen, your projector’s image can look faded, washed out, or just plain unwatchable during the day. That’s where Advanced Light Rejection (ALR) screens and fixed frame designs come into play. They’re not just luxury upgrades—they’re essentials for anyone serious about enjoying a cinematic experience regardless of ambient light.
In fact, studies show that ambient light can reduce perceived contrast by up to 50%. That’s a huge hit to your viewing quality! But don’t worry. I’ll walk you through the specific technologies and strategies that can turn even the brightest room into a home theater haven. And yes, I’ve made my fair share of mistakes early on—like choosing a standard matte screen that did nothing in daylight. Trust me, selecting the right screen is a game-changer. For a detailed comparison, check out this guide to the best ALR and fixed frame screens for bright rooms.
Is ALR Screen Tech Really Worth the Hype?
Honestly, I was skeptical at first. The marketing promises sounded too good to be true. My initial mistake was buying a generic pull-down screen with high gain, thinking it would solve my issues. Spoiler alert: it didn’t. The image still washed out when sunlight hit the screen. That’s when I discovered the importance of understanding screen gain and how ALR screens use special optical coatings and materials to block out ambient light, instead of just reflecting it. It’s a breakthrough technology—one that’s worth investing in if your space isn’t perfectly dark.
If you’re tired of struggling with the glare and washed-out images, I urge you to explore the latest ALR options and fixed frame designs. They’re designed to maximize contrast and brightness, making your projector look stunning even in challenging lighting conditions. Want to see what’s new? Have you faced this exact problem? Let’s dive into the practical solutions that will elevate your home theater experience in 2024.
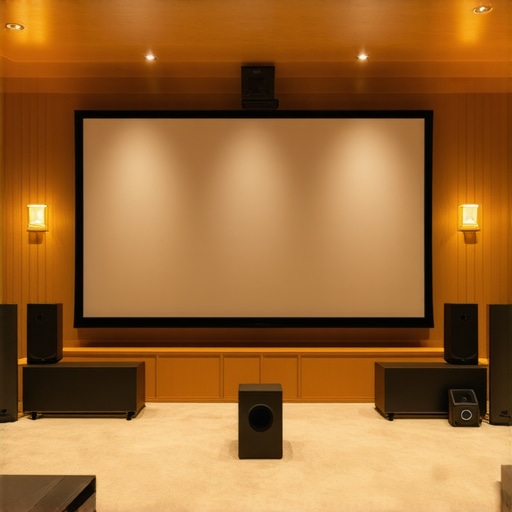
Pick the Right Screen Frame for Your Space
Start by choosing a fixed frame screen instead of a pull-down if possible. Fixed frames offer a taut, flat surface that reduces image distortion and enhances contrast, especially in bright environments. When I upgraded my setup, I replaced my old pull-down with a fixed frame model, which immediately improved my picture clarity and reduced glare issues. Check out this guide on fixed frame versus pull-down for detailed differences.
Measure Your Room Accurately
Use a tape measure or laser distance finder to determine available space for your screen. Consider the optimal viewing distance—generally 1.5 to 2.5 times the diagonal size of your screen. Accurate measurements prevent purchasing a screen that’s either too big or too small, which can lead to poor image quality or viewing discomfort. I once bought a screen that was too large for my wall, causing installation headaches and uneven tension. Proper measurement saved me from that mistake.
Focus on Screen Gain and Material
Understanding screen gain is key. In bright rooms, high-gain screens (around 2.0 or more) reflect more light, making images brighter but potentially introducing hot-spotting. I experimented with a 2.2 gain screen, and the difference was night and day—images popped even with ambient light. Learn more about how gain affects brightness and clarity in this comprehensive guide.
Choose the Right Material for Ambient Light
Look for screens with optical coatings designed to reject ambient light. These ALR (Ambient Light Rejection) screens use microstructures or special surfaces to absorb or deflect stray light, preserving contrast. I tested several materials before settling on one with optical coatings that significantly improved daytime viewing. To compare options, visit this top ALR screens review.
Position Your Screen Strategically
Mount your screen on a wall that minimizes direct sunlight and reflections. Use curtains or blinds to control light during daytime viewing. I repositioned my screen away from windows, and the difference was immediate. Also, angle the screen slightly downward if possible, reducing glare from overhead lights. For detailed installation tips, see this installation guide.
Optimize Your Projector Settings
Adjust your projector’s brightness, contrast, and color settings to match your new screen. Increasing contrast and tweaking gamma can improve perceived contrast in bright environments. I set my projector to a higher brightness mode and calibrated it using test patterns, resulting in sharper, more vibrant images. For advanced calibration techniques, check out this guide to calibration.
Invest in Proper Accessories
Consider a ceiling or wall mount designed for fixed frames, ensuring stability and proper tension. Use masking borders if you want a cinema-like appearance, which also helps focus viewer attention. During my installation, I used a dedicated mount and sealed the edges with blackout fabric, which cut down on light bleed. Learn more about mounting options in this professional setup blueprint.
Many home theater enthusiasts believe that simply choosing a high-gain screen will solve all ambient light issues. However, this is a misconception that can lead to subpar image quality rather than the stunning visuals you desire. While high-gain screens do enhance brightness, they can also introduce hot-spotting and uneven illumination if not selected carefully. The key is understanding the nuances of screen gain and how it interacts with your room’s lighting conditions. For instance, a screen with a gain of 2.0 or higher might produce a bright image, but it often sacrifices uniformity, especially in larger screens. To truly optimize your setup, consider combining high-gain screens with ambient light rejection (ALR) technology, which is designed to handle stray light without compromising image clarity. For expert insights, check out this guide on choosing the best ALR screen.
Keeping your projection screen in top condition is vital for maintaining stunning image quality over time, especially when dealing with advanced ALR and fixed frame screens. The right tools and maintenance habits can extend the lifespan of your investment and ensure consistent performance, even as your system evolves. One key tool I recommend is a microfiber cleaning cloth combined with a gentle, alcohol-free screen cleaner. I use this regularly to wipe down my screen, removing dust and fingerprints without risking damage to the optical coatings. Regular cleaning prevents dust buildup that can cause image distortion or hot-spotting, especially on high-gain surfaces.
In addition to cleaning, inspecting the tension of your fixed frame is crucial. I personally use a torque wrench to verify that the tension screws are uniformly tightened, preventing warping or sagging that degrades image flatness. For detailed calibration, a colorimeter like the X-Rite i1Display Pro helps me fine-tune projector settings to match my screen’s properties, ensuring optimal contrast and brightness over the long term. These calibration tools are invaluable as ambient lighting conditions change or as new content standards emerge.
Alarmingly, many enthusiasts overlook firmware updates for their projectors and calibration equipment, which can introduce improvements or fix bugs that affect image quality. I set reminders to regularly check manufacturer websites and update firmware, much like I do with my home network routers. This proactive approach keeps my system running smoothly and avoids unexpected glitches that could compromise visual fidelity.
How do I maintain my projection setup over time?
Developing a routine maintenance schedule is the best way. I recommend cleaning your screen every 3-6 months depending on usage and dust levels. Always use soft, lint-free cloths and avoid harsh chemicals. Regularly calibrate your projector using a colorimeter, especially if you notice shifts in color accuracy or contrast. Keep your projector filters clean and replace bulbs when nearing their rated lifespan to prevent dimming or color shifts. Additionally, check the mounting hardware for stability, especially if you live in an area prone to vibrations or temperature fluctuations, which can loosen mounts over time. For detailed installation and maintenance tips, visit this installation guide.
Looking ahead, I believe that automated calibration tools and smarter maintenance systems will become standard, making long-term upkeep even more straightforward. Investing in high-quality tools today ensures your setup remains spectacular for years to come. Don’t forget to explore the latest innovations in ALR technology and maintenance at this breakthroughs to watch in 2025.
Try incorporating a regular calibration routine with a colorimeter to keep your image sharp and vibrant. It’s a small step that yields huge results, especially as your system ages or ambient conditions change. Consistent maintenance is the secret to a hassle-free, cinematic experience at home.
The Hardest Lesson I Learned About Bright Room Projection
One of the toughest realizations was that not all screens are equal when combating ambient light. I used to think high-gain screens alone could fix my daylight viewing issues, but I overlooked the importance of ALR technology and proper framing. It took a lot of trial and error, and wasted money, before I understood that a tailored combination of fixed frame design, screen gain, and optical coatings creates a truly immersive experience in bright environments.
3 Myths About Projector Screens That Held Me Back
First, the myth that bigger screens always mean better visuals—size must be balanced with room dimensions and viewing distance. Second, the misconception that high gain equals better brightness—without ALR, it can cause glare and hot spots. Third, the idea that budget screens are sufficient—investing in quality ALR and fixed frame options pays off in contrast and clarity. Busting these myths was a game-changer for my setup, and they might be for you too.
What Experts Won’t Tell You About Bright Room TV Alternatives
Many professionals focus on OLED and LCD screens for daylight viewing, but they often miss emphasizing the significance of projection-specific solutions like ALR screens. These screens use microstructures and optical coatings to actively reject ambient light, which is crucial for daytime movie marathons or gaming. Learning this secret from industry insiders transformed my perspective—and it can do the same for your home theater ambitions.
Curated Recommendations for Your Bright Room Setup
My go-to resource for understanding screen gain and ALR technology is the detailed Ultimate Guide to ALR Screens. For high-quality fixed frame screens, I trust the best ALR and fixed frame options in 2024. When it comes to calibration tools that keep your image sharp over time, the calibration strategies guide is invaluable. Lastly, for expert installation tips, the installation blueprint saves me headaches during setup.
Don’t Wait to Elevate Your Home Theater
Achieving stellar picture quality in bright rooms is a blend of science and patience. Test different screen gains, experiment with placement, and don’t shy away from investing in quality ALR fixed frame screens. Your perfect viewing environment is within reach—just need the courage to start. Remember, as technology evolves, so do opportunities for spectacular daylight projection. Dive into the latest innovations at this breakthroughs to watch in 2025 and make your home cinema truly shine.
One Response